Bench Vises
Here’s a rundown on the different types of vises, and which one or two would be best for your workbench.
벤치 바이스
다양한 유형의 바이스에 대한 개요와 작업대에 가장 적합한 바이스 몇 개를 소개합니다.
Think of a bench vise as a tool that's as essential to your success as a hand plane, router, or tablesaw. Although clamps might substitute in some situations, they tend to get in the way, and a vise gives you freedom to do almost any type of work.
Woodworking vises differ from metalworking vises in that they attach to the bottom of the bench surface or are built into it, with (typically wood) jaws flush with the benchtop. Metalworking vises usually mount to the top of a bench.
Woodworking vises vary in price from about $30 to as much as $400. Generally, once you decide on a particular style of vise, the more you spend, the better the quality and effectiveness of that vise. Now let's take a look at the most common types of vises for woodworking.
벤치 바이스는 손대패, 루터 또는 테이블쏘만큼 작업에 필수적인 도구라고 생각하세요. 클램프가 어떤 상황에서는 대체될 수 있지만 방해가 되는 경향이 있으며, 바이스는 거의 모든 유형의 작업을 할 수 있는 편의를 제공합니다.
목공용 바이스는 작업대 바닥에 부착되거나 작업대에 내장되어 있고 (일반적으로 나무) 턱이 작업대 상판과 평행하게 되어 있다는 점에서 금속작업용 바이스와 다릅니다. 금속작업용 바이스는 보통 작업대 상판 위에 장착됩니다.
목공용 바이스의 가격은 약 30달러에서 최대 400달러까지 다양합니다. 일반적으로 특정 스타일의 바이스를 결정하면 고가일수록 바이스의 품질과 효과가 더 좋습니다. 이제 목공용 바이스의 가장 일반적인 유형을 살펴보겠습니다.
Front vises
As the name implies, these mount to the front (long edge) of the bench, typically on a left-hand corner. Left-handed folks usually prefer a front vise mounted on the right corner.
프런트 바이스
이름에서 알 수 있듯이, 이 바이스는 작업대의 앞면(긴 모서리)에 장착되며, 일반적으로 왼쪽 모서리에 장착됩니다. 왼손잡이는 보통 오른쪽 모서리에 장착된 프런트 바이스를 선호합니다.
Face vise
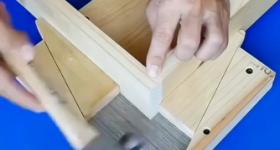
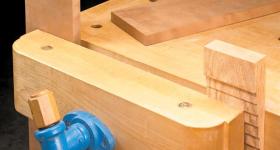
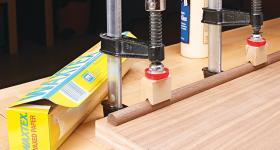
These come in two styles: one with steel or cast-iron jaws you can use as is or add auxiliary wooden jaws [Photos A and C], and the other with no jaws, requiring you to build wooden jaws [Photos B, D, and E]. The first typically costs more, but installs easier. For both styles, mount the inner jaw flush with the benchtop surface and edge (or apron), so that you can secure long workpieces in the vise and also clamp the board's far end to the bench for added stability. Your benchtop must clear the bench base or legs for mounting. Make sure the mounting plate and rails won't interfere with dogholes made to use with an end or tail vise [Photo E].
페이스 바이스
이것들은 두 가지 스타일로 제공됩니다. 하나는 그대로 사용하거나 보조 판재를 장착할 수 있는 강철 또는 주철 턱이 있는 것[사진 A 및 C]이고, 다른 하나는 턱이 없어서 나무 턱을 만들어야 하는 것[사진 B, D 및 E]입니다. 첫 번째 스타일은 일반적으로 비용이 더 많이 들지만 설치가 더 쉽습니다. 두 스타일 모두 내부 턱을 작업대 상판과 같은 높이로 장착하여 바이스에 긴 볼트로 고정하고 안정성을 높이기 위해 바이스 끝쪽을 작업대 아래에서 고정할 수 있습니다. 바이스 장착을 위해서는 작업대 프레임 또는 다리에 바이스 레일이 들어갈 수 있는 홀이 필요합니다. 장착한 보조 판재와 레일이 작업대 상판에 가공한 도그홀을 막지는 않는지 확인하십시오[사진 E].
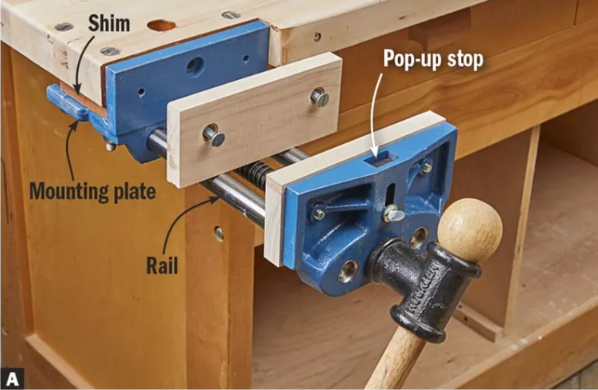
Bolt or screw this type of face vise onto an existing benchtop in less than an hour. You might have to shim it to flush the jaws with the benchtop and notch the benchtop to align the inner jaw with the edge.
이 유형의 페이스 바이스를 작업대에 볼트나 나사로 고정하는 데 한 시간도 걸리지 않습니다. 턱을 작업대 높이와 맞추기 위해 보조 판재를 깎아야 할 수도 있고, 작업대 상판 선과 맞추기 위해 내부 턱을 정렬해야 할 수도 있습니다.
This vise hardware requires a shop-made outer jaw of 1 1⁄2–3" thick hardwood with dogholes (if you so choose) for holding stock with bench dogs. The benchtop’s edge or apron typically serves as the inner jaw.
이 바이스 하드웨어는 벤치독과 함께 부재를 고정하기 위한 도그홀(원하는 경우)이 있는 1 1⁄2–3" 두께의 단단한 판재로 만든 외부 턱이 필요합니다. 작업대 측면이나 프레임은 일반적으로 내부 턱 역할을 합니다.
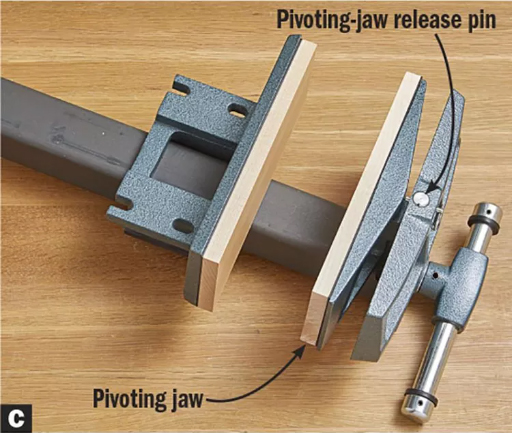
A pivoting-jaw vise holds irregular-shape stock without racking the jaws. You also can remove the pivoting jaw for parallel-jaw clamping. Magnet-lined wood jaw pads stay in place without screws.
피벗 죠우 바이스는 죠우를 걸치지 않고 불규칙한 모양의 부재를 고정합니다. 또한 평행 죠우 클램핑을 위해 피벗 죠우를 제거할 수도 있습니다. 자석으로 안감 처리된 목재 죠우 패드는 나사 없이도 제자리에 고정됩니다.

A cast-iron-jaw vise can be recessed into the bottom of a bench for maximum strength and stability. A thick outer jaw distributes clamping force over a wide surface area.
주철 턱 바이스는 최대 강도와 안정성을 위해 작업대 아래쪽에 움푹 들어갈 수 있습니다. 두꺼운 외부 턱은 넓은 표면적에 클램핑 힘을 분산시킵니다.
Things to know:
A quickrelease jaw lets you move the vise in or out without a lot of turns of the handle.
A popup stop on some face vises eliminates the need to drill a doghole in the movable jaw.
The longer the handle, the more leverage you can apply to the vise. But don't get crazy here: Apply only enough force so a workpiece won't budge.
Most facevise jaws toe in slightly at the top, then go parallel under pressure.
알아두어야 할 사항:
퀵릴리스 죠우를 사용하면 핸들을 많이 돌리지 않고도 바이스를 안팎으로 움직일 수 있습니다.
일부 페이스 바이스의 팝업 스톱은 가동식 죠우에 도그홀을 뚫을 필요가 없습니다.
핸들이 길수록 바이스에 더 많은 힘을 가할 수 있습니다. 하지만 여기서 너무 과하게 하지 마세요. 작업물이 움직이지 않을 만큼의 힘만 가하세요.
대부분의 페이스 바이스 죠우는 상단에서 약간 안쪽으로 들어간 다음 압력을 받으면 평행이 됩니다.
Shoulder vise
Found traditionally on Scandinavian-style workbenches, a shoulder vise's greatest advantage is open space between the jaws, free of support rails or a screw. The benchtop or apron serves as the fixed jaw, while the movable jaw travels on a single screw [Photo F]. Because the outer jaw has a tongue that slides in a groove on the fixed arm, it has enough play to let you clamp uneven-shaped workpieces.
숄더 바이스
전통적으로 스칸디나비아 스타일 작업대에서 볼 수 있는 숄더 바이스의 가장 큰 장점은 턱 사이의 열린 공간으로, 바이스를 지지하기 위한 레일이나 나사가 없습니다. 작업대나 작업대 프레임은 고정 턱 역할을 하는 반면, 가동 턱은 하나의 나사로 이동합니다[사진 F]. 바깥쪽 턱에는 고정 암의 홈에서 미끄러지는 텅이 있기 때문에 고르지 않은 모양의 작업물을 고정할 수 있을 만큼 여유가 있습니다.
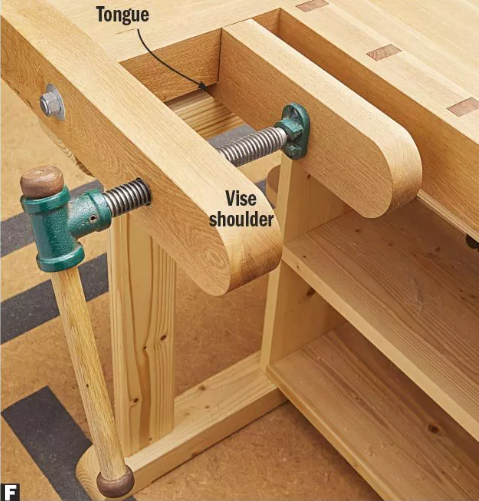
A shoulder vise gives you floor-to-ceiling clamping space between its jaws. A threaded bushing mortised into the vise shoulder (unseen) keeps the screw on track.
숄더 바이스는 턱 사이에 바닥부터 높이에 상관없이 클램핑 공간을 제공합니다. 바이스 숄더 내부에(보이지 않음)에 나사산이 있는 부싱이 나사를 궤도에 유지하게 합니다.
Things to know:
Low cost: Besides wood, you only need the screw assembly, selling for as little as $30.
Protruding from the bench edge, this vise can be a bump hazard for your hips and legs. And high humidity could cause the parts to swell and bind.
This vise does not easily retrofit to an existing bench.
알아두어야 할 사항:
저렴한 가격: 나무 외에 나사 조립품만 있으면 되고, 30달러에 판매됩니다.
작업대에서 튀어나오는 이 바이스는 엉덩이와 다리에 부딪힐 위험이 있습니다. 그리고 습도가 높으면 부품이 부풀어 올라 묶일 수 있습니다.
이 바이스는 기존 작업대에 쉽게 장착할 수 없습니다.(작업대 개조가 필요하단 얘기)
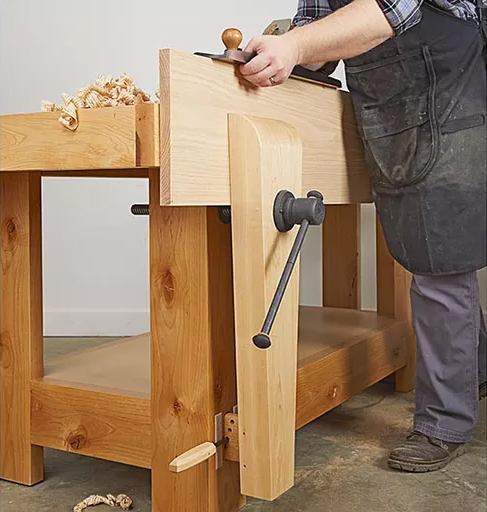
Leg vise
As the name implies, this vise installs into the bench leg, which sometimes serves as the fixed jaw. Build the outer jaw from thick stock about three-quarters of the leg's length. You can buy the hardware to make a leg vise for about $100.
레그 바이스
이름에서 알 수 있듯이, 이 바이스는 작업대 다리에 설치되는데, 이 다리는 때때로 고정된 턱 역할을 합니다. 다리 길이의 약 3/4 정도 되는 두꺼운 판재로 바깥쪽 턱을 만듭니다. 레그 바이스를 만드는 하드웨어는 약 100달러에 살 수 있습니다.
Things to know:
* These can be built two ways: With an inset leg [Photo G], you get more toe-kick space below. The fixed jaw is what you build it up to be (in this case, simply the bench's apron). With a flush-fitting vise, the leg itself serves as a full-length fixed jaw. In both cases, keep the movable jaw 21⁄2 –3" thick to avoid deflection.
알아두어야 할 사항:
* 두 가지 방법으로 만들 수 있습니다. 인셋 다리[사진 G]를 사용하면 아래에 더 많은 발끝 공간을 확보할 수 있습니다. 고정 턱은 여러분이 만들어낸 것입니다(이 경우 단순히 작업대의 프레임). 꼭 맞는 바이스를 사용하면 다리 자체가 전체 길이의 고정 턱 역할을 합니다. 두 경우 모두 처짐을 방지하기 위해 가동 턱의 두께를 21⁄2 –3인치로 유지하세요.
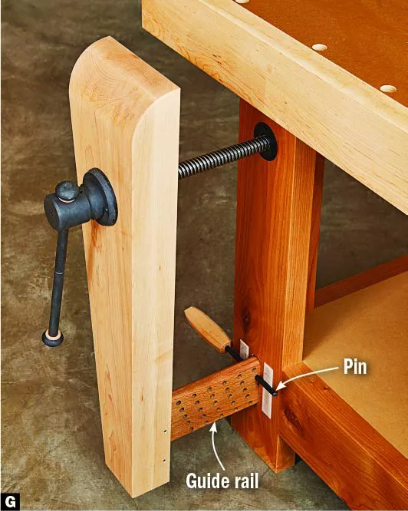
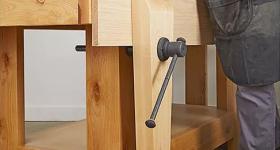
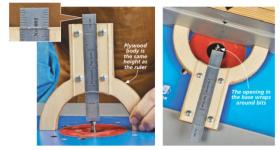
A leg vise moves via a single screw with a pinned sliding guide rail to maintain parallelism. The guide-rail pin rests against end-grain hard-maple pads that prevent compressing the softer alder leg of this bench.
* The pin and sliding guide rail keep the jaw parallel for even clamping force. Reposition the pin for the workpiece you're clamping.
* A low screw location decreases clamping force and increases deflection, so install the screw 8–9" below the benchtop.
* A leg vise excels at holding long stock on edge; you can also clamp the workpiece to the benchtop edge for added stability.
* With only a single screw, you can clamp boards vertically on either side of the screw.
* Scissor-type variations replace the sliding guide rail and maintain jaw parallelism, but cost about $100–$200 and work best with a flush leg.
* These can be difficult to retrofit to an existing bench, depending on the leg style, size, and placement on your bench. (However, you can build up some legs to make a leg vise work.)
레그 바이스는 평행도를 유지하기 위해 고정된 슬라이딩 가이드 레일이 있는 나사를 통해 움직입니다. 가이드 레일 핀은 이 벤치의 부드러운 엘더(오리나무) 다리를 압축하지 않는 엔드 그레인 하드 메이플(단풍나무) 판재에 기대어 있습니다.
* 핀과 슬라이딩 가이드 레일은 턱을 평행하게 유지하여 클램핑 힘을 균일하게 합니다. 클램핑하는 작업물에 맞게 핀을 재배치합니다.
* 나사 위치가 낮으면 클램핑 힘이 감소하고 처짐이 증가하므로 나사를 작업대 상판 아래 8~9인치에 설치합니다.
* 레그 바이스는 긴 재고를 가장자리에 고정하는 데 탁월합니다. 작업물을 작업대 가장자리에 고정하여 안정성을 높일 수도 있습니다.
* 나사가 하나만 있으므로 한 번에 나사 위 아래에 판재를 수직으로 클램핑할 수 있습니다.
* 가위형 변형은 슬라이딩 가이드 레일을 대체하고 턱 평행도를 유지하지만 약 $100~$200이 들고 플러시 레그와 함께 사용하는 것이 가장 좋습니다.
* 다리 스타일, 크기 및 작업대의 배치에 따라 기존 작업대에 장착하기 어려울 수 있습니다. (그러나 다리를 몇 개 만들어 레그 바이스를 사용할 수 있습니다.)
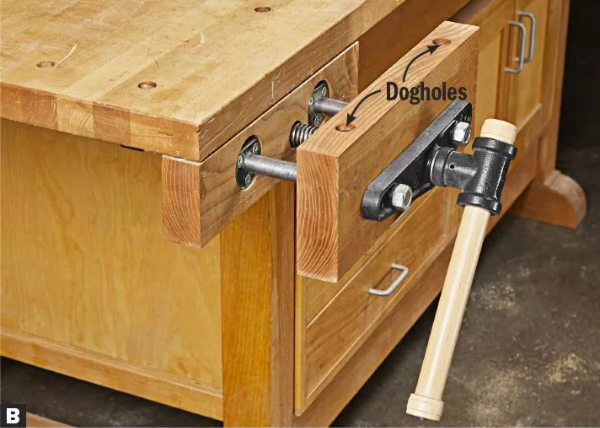
End vises
These mount to the end of the bench and typically work with bench dogs along the length of the benchtop. If you prefer rectangular dogholes, cut those notches in the boards before gluing them to the benchtop; round holes can be drilled before or after assembly.
엔드 바이스
작업대 끝에 장착되며 일반적으로 작업대 상판 길이를 따라 벤치독과 함께 작동합니다. 직사각형 도그홀을 선호하는 경우 작업대 상판에 접착하기 전에 보드에 홈을 자릅니다. 둥근 구멍은 조립 전이나 후에 뚫을 수 있습니다.
Tail vise
A traditional tail vise [Photos H and I] consists of a rectangular or L-shape block of wood (the jaw) fastened to a steel or cast-iron fixture that slides back and forth in a cutaway corner of the bench.
테일 바이스
전통적인 테일 바이스[사진 H 및 I]는 작업대의 컷어웨이 모서리에서 앞뒤로 밀어 넣는 강철 또는 주철 고정 장치에 고정된 직사각형 또는 L자 모양의 나무 블록(턱)으로 구성됩니다.
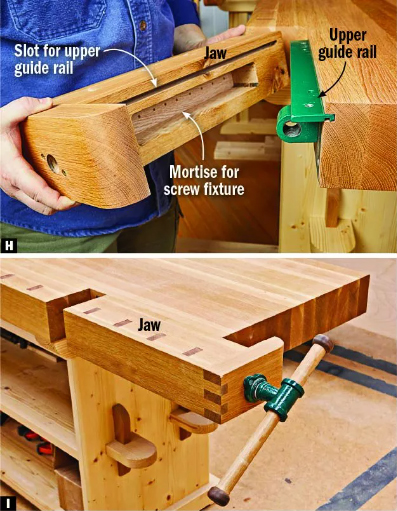
A long mortise accepts the screw and threaded fixture, and the upper guide rail fits in the slot. (A lower guide rail, not shown, mounts beneath the jaw.) The tail vise slides back and forth along the guide rails, held in place by the screw assembly.
긴 홈이 나사와 나사산 고정물을 수용하고, 상부 가이드 레일이 슬롯에 맞춰집니다. (표시되지 않은 하부 가이드 레일은 턱 아래에 장착됩니다.) 테일 바이스는 나사 조립체에 의해 제자리에 고정된 가이드 레일을 따라 앞뒤로 움직입니다.
Things to know:
You have to space the vise and dogholes around the bench legs and any facevise mounting hardware.
You also can hold stock vertically between the movable jaw and the bench.
A quick release, available on some tail vises, speeds up big changes in vise position. n A tail vise holds long stock securely without any springiness. Too much clamping force, however, can cause boards to bow up.
Retrofitting one to an existing bench typically requires adding material to the benchtop to stay outside the legs or base.
알아두어야 할 사항:
바이스와 도그홀을 작업대 다리와 페이스 바이스 마운팅 하드웨어 주위에 배치해야 합니다
또한 가동식 턱과 작업대 사이에 수직으로 부재를 고정할 수 있습니다.
일부 테일 바이스에서 사용 가능한 퀵 릴리스는 바이스 위치를 빠르게 변경할 수 있게 해줍니다. n 테일 바이스는 탄력성 없이 긴 부재를 안전하게 고정합니다. 그러나 클램핑 힘이 너무 강하면 부재가 휘어질 수 있습니다.
기존 작업대에 장착하려면 일반적으로 다리나 베이스 외부에 위치하도록 작업대 상판에 재료를 추가하는 개조를 해야 합니다.
End vise
Essentially a large face vise, this type usually spans most, if not all, of the benchtop's width [Photo J]. Typically, you use two rows of bench dogs to hold long or wide stock.
엔드 바이스
기본적으로 대형 페이스 바이스인 이 유형은 일반적으로 작업대 너비의 대부분, 아니면 전부를 차지합니다 [사진 J]. 일반적으로 두 줄의 벤치독을 사용하여 길거나 넓은 부재를 고정합니다.
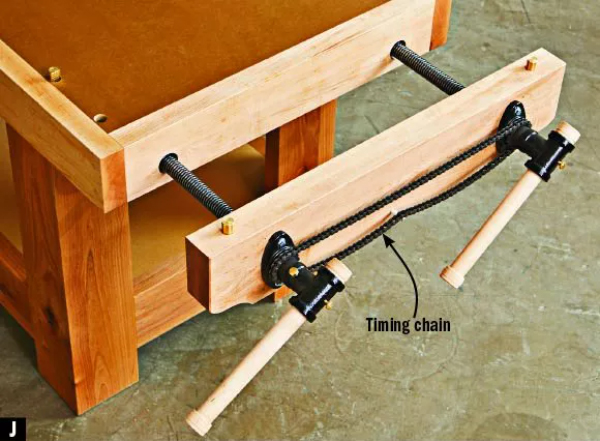
The timing chain on a twin-screw end vise syncs the screws. You can adjust either screw should the vise jaws get out of parallel. You can intentionally make the jaws unparallel for clamping irregular-shape workpieces.
트윈 스크류 엔드 바이스의 타이밍 체인은 핸들을 같이 움직입니다. 만약 바이스 턱이 평행에서 벗어나면 두 나사를 조정해서 맞출 수 있습니다. 불규칙한 모양의 작업물을 클램핑하기 위해 의도적으로 턱을 평행하지 않게 만들 수 있습니다.
Things to know:
The bench's apron, or a builtup end of the benchtop, serves as the inner jaw.
A twinscrew vise has a large opening between the screws for holding wide stock or assembled drawers.
Planing long boards held in the jaws can move the bench sideways. Instead, capture the workpiece with bench dogs to take advantage of the bench's full mass.
If an end vise spans less than the full width of the benchtop, install it flush with one edge (rather than centering it) so you can easily handplane stock held with bench dogs.
알아두어야 할 사항:
작업대의 프레임 또는 작업대 상판에 조립된 끝은 내부 턱 역할을 합니다.
트윈스크류 바이스는 넓은 재고 또는 조립된 서랍을 고정하기 위한 나사 사이에 큰 공간이 있습니다.
바이스에 큰 부재를 평면으로 고정하면 작업대를 확장할 수 있습니다. 대신 벤치독으로 작업물을 고정해 작업대의 전체 면을 활용하세요.
엔드 바이스가 작업대의 전체 너비보다 짧으면 한쪽 가장자리와 평평하게 설치하여(중앙에 두지 않고) 벤치독으로 고정된 부재를 쉽게 손으로 대패질 할 수 있습니다.
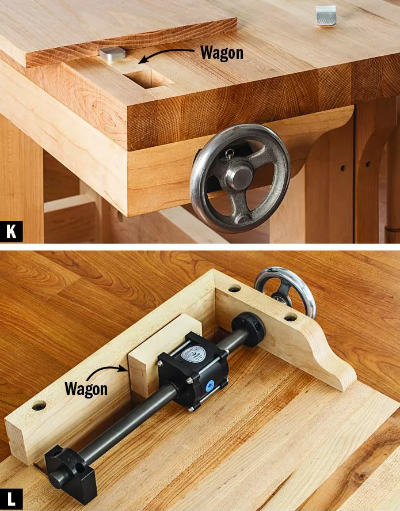
Wagon vise
A condensed version of a tail vise, a wagon vise [Photos K and L] holds long stock securely, but with less capacity (because a tail vise opens beyond the bench's end).
왜건 바이스
테일 바이스의 축소 버전인 왜건 바이스[사진 K 및 L]는 긴 부재를 안전하게 고정하지만 용량이 적습니다(테일 바이스는 작업대 끝 너머로 열리기 때문).
Things to know:
The gap in front of the wagon can be used to hold narrow stock vertically.
A wagon vise can be retrofitted to an existing bench by cutting a notch for the wagon and screw, and attaching the mounting hardware.
알아두어야 할 사항:
왜건 앞의 틈새는 좁은 부재를 수직으로 고정할 수 있습니다.
왜건 바이스는 왜건과 나사를 위한 홈을 뚫고 하드웨어를 부착하여 기존 벤치를 개조하여 장착할 수 있습니다.
Sources for vises: [바이스 공급처]
* Lee Valley 800-871-8158
* Rockler 800-279-4441
* Woodcraft 800-225-1153
* Highland Woodworking 800-241-6748
* Yost Vises 616-396-2063
* Lie-Nielsen 800-327-2520
* Hovarter Custom Vise 810-545-6179
* Benchcrafted
* Wilton Tools 800-274-6848