밴드쏘는 세팅이 쉽지 않은 기계 중 하나입니다.
잘못된 세팅으로 사용할 경우 의도한 방향으로 가공되지 않는 스나이핑 현상이 생기거나 심할 경우 톱날이 끊어질 수 도 있습니다.
기계는 올바르게 셋팅해서 사용해야 오랫 동안 정확하게 가공할 수 있습니다.
Perfect Band Saw Cuts
Attention to a few easy-to-master details guarantees accurate cuts.
밴드쏘 완벽한 컷
몇 가지 디테일에 주의를 기울이면 정확한 컷이 보장됩니다.
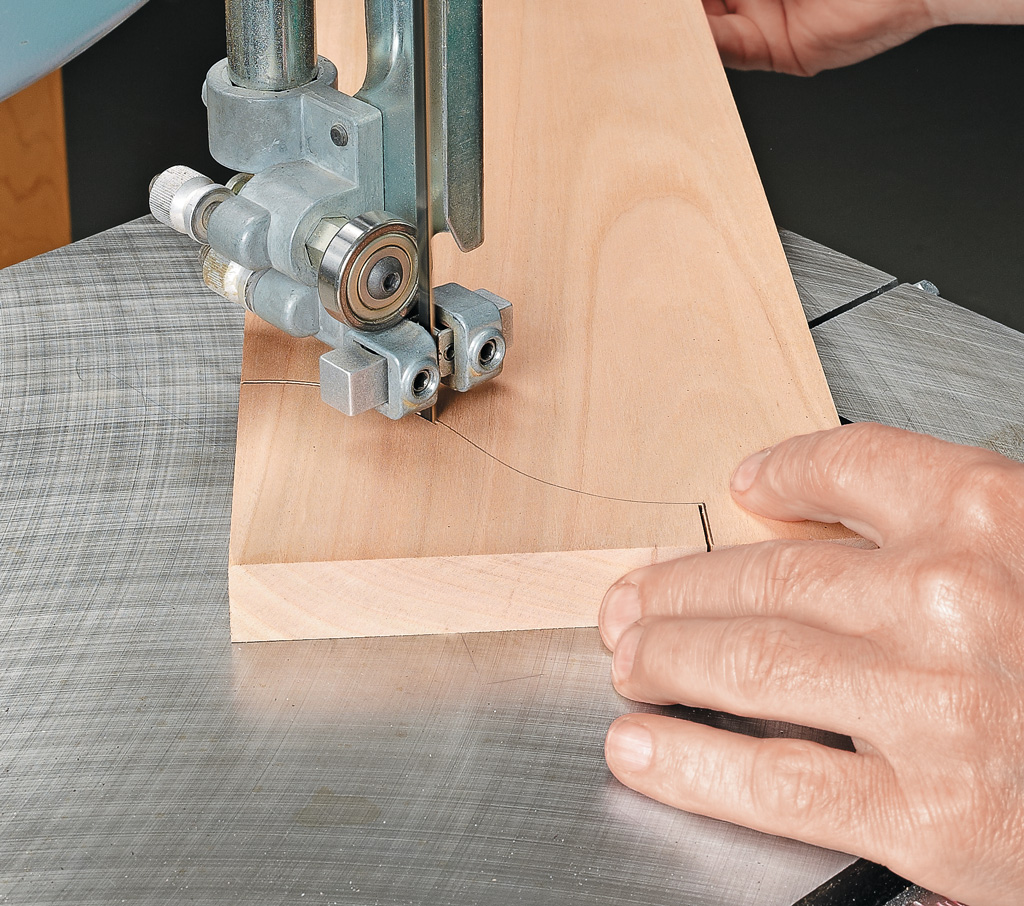
During construction of a project, more often than not, I make at least one trip to the band saw. Usually this involves cutting a part to shape “free-hand.” By this, I mean simply cutting to a layout line without the aid of a fence or other type of guide. This is essentially what the band saw is designed to do. The task can be as simple as making a straight taper cut or something more involved like shaping a complex profile.
The catch is that good results are not automatic. Inaccurate cuts with rough, burned edges can force you to perform a lot of tedious cleanup on the workpiece with a file, sandpaper, or sanding drum. But a poor result usually stems from a hasty setup and execution. All it takes is a little planning and the right approach to get clean, precise cuts.
작업중 저는 적어도 한 번 이상 밴드쏘를 사용합니다. 보통 "자유곡선"을 가공하기 위함입니다. 펜스나 다른 종류의 가이드 없이 단순히 레이아웃 선만 보고자른다는 것입니다. 이것은 밴드쏘의 본질적 기능입니다. 작업은 직선 절단을 하는 것처럼 간단하거나 복잡한 곡선 작업을 수행할 수도 있습니다.
문제는 좋은 결과가 저절로 나오지 않는다는 것입니다. 거칠고 톱날에 의해 탄 부분이 있는 부정확한 절단면은 파일, 사포 또는 샌딩 드럼으로 작업물에 대한 많은 지루한 후가공을 수행해야 합니다. 그러나 좋지 않은 결과는 대개 섣부른 기계 세팅과 사용에서 비롯됩니다. 약간의 계획과 올바른 접근으로 깨끗하고 정확한 절단면을 얻을 수 있습니다.
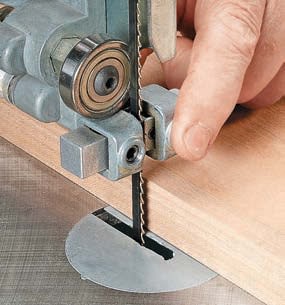
SET UP THE SAW
The starting point is proper setup of the saw. And the first step is to choose the right blade for the job. There are two aspects to this — blade width and tooth count.
밴드쏘 세팅
그 시작점은 톱의 적절한 세팅입니다. 그리고 첫 번째 단계는 작업에 적합한 날을 선택하는 것입니다. 여기에는 톱날의 폭과 톱니 수라는 두 가지 측면이 있습니다.
BLADE WIDTH.
When cutting a profile, you need to match the width of the blade to the contour of the curve. In a nutshell, the narrower the blade, the tighter the radius it will cut. A blade that’s too wide may not allow for the turns necessary to follow a layout line. On the other hand, very narrow blades tend to flex and can be difficult to keep on track. Your best bet is to choose the widest blade that will still allow you to easily follow the layout line. The Shop Tip at left provides a handy turning radius reference.
TOOTH COUNT.
Choosing a blade with the right tooth count involves a balance. More teeth creates a smooth surface but a slow cut. A slow feed may cause burning while the tendency to force the cut makes steering difficult. As is often the case, the middle ground is the best place to be. For general use, a 1 ⁄ 4"-wide blade with 6 teeth per inch works well.
GUIDES.
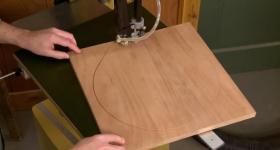
Setting the height of the blade guides correctly is the second component of the setup. The guides should be as close to the surface of the workpiece as possible without blocking your view of the layout line (lower photo above). This helps minimize blade vibration and deflection.
톱날의 너비.
곡선을 따라 절단할 때 톱날의 너비를 원곡선의 등고선과 일치시켜야 합니다. 간단히 말해서, 날이 좁을수록 절단 반경이 더 좁아집니다. 톱날의 너비가 너무 넓으면 곡선을 따르는 데 필요한 회전이 허용되지 않을 수 있습니다. 반면에, 너비가 너무 좁으면 휘어지는 경향이 있어 곡선을 계속 따라가기 어려울 수 있습니다. 가장 좋은 방법은 레이아웃 선을 쉽게 따라갈 수 있는 가장 넓은 톱날을 선택하는 것입니다. 아래의 Shop Tip에서 톱날의 편리한 회전 반경을 참조하세요.
톱날 개수.
올바른 톱니 수를 가진 날을 선택하려면 균형이 필요합니다. 더 많은 톱니는 매끄러운 단면을 만들지만 절단 속도가 느립니다. 거기에 이송 속도까지 느리면 단면이 고열로 탈 수 있고, 강제로 밀면 조향이 어렵게 됩니다. 대부분 그렇듯이, 중간 지점이 가장 좋습니다. 일반적으로 인치당 6개의 톱니가 있는 1/4" 너비의 톱날이 적당합니다.
가이드.
톱날 가이드 높이를 올바르게 설정하는 것이 세팅의 두 번째 구성 요소입니다. 가이드는 레이아웃 선의 시야를 가리지 않고 가공 부재 표면에 최대한 가까이 있어야 합니다(위 사진). 이를 통해 톱날의 진동 및 처짐을 최소화할 수 있습니다.
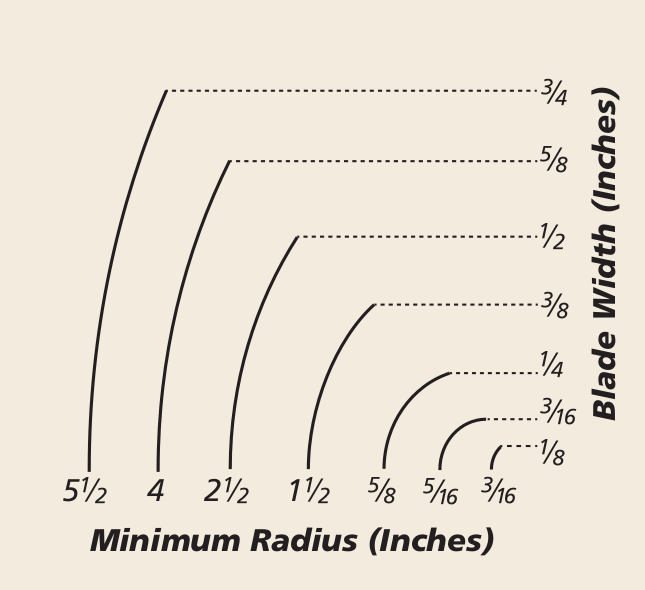
Shop Tip: Blade Width
As you see above, a blade’s tightest turning radius depends on its width. When matching the blade width to the profile being cut, it’s best not to push the limits.
톱날의 너비
위에서 보는 바와 같이 톱날의 회전 반경은 톱날 너비에 따라 달라집니다. 절단 중인 윤곽선에 톱날 너비를 일치시킬 때는 한계를 넘지 않는 것이 좋습니다.
THINK AHEAD
Once the setup is complete, don’t be in a rush to start the cuts. Sometimes a little planning can actually help get the job done quicker and easier. Let me offer some food for thought.
미리 생각해 보세요
세팅이 완료되면 서두르지 말고 절단을 시작하십시오. 때때로 작은 계획이 실제로 일을 더 빠르고 쉽게 끝내는데 도움을 줄 수 있습니다. 생각할 거리를 드리겠습니다.
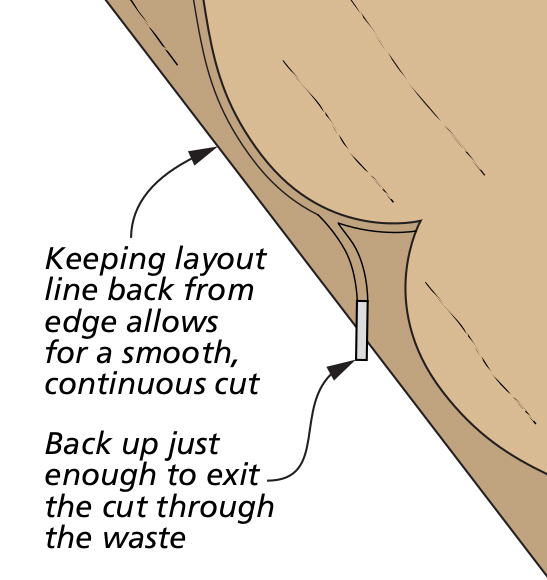
First, when marking a profile on a workpiece, try to keep the layout lines 1⁄8 or more back from any edge (drawing above). The goal is to prevent the blade from breaking through the edge during the cut. A continuous cut in which the blade is always fully engaged will be much smoother.
먼저, 작업 부재에 프로파일을 표시할 때 배치 선을 1/8" 이상 뒤로 유지하십시오(위의 그리기). 절단 과정에서 톱날이 선을 침범하는 것을 방지하는 것이 목표입니다. 톱날이 항상 완전히 맞물리는 연속 절단이 단면을 훨씬 더 부드럽게 만듭니다.
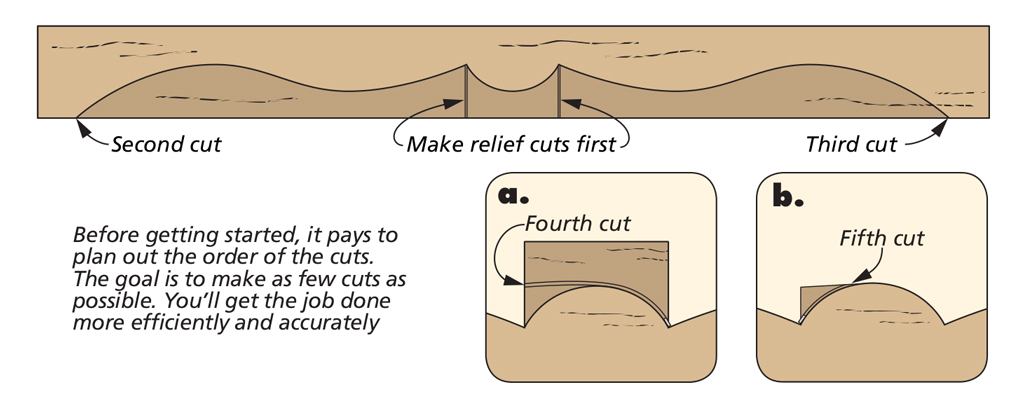
THE FIRST CUT.
When cutting a complex profile with multiple, intersecting curves, plan the order of the cuts in advance. If possible, you want to cut each separate section of the profile with a single cut. The drawing above illustrates this idea. The first cuts are simply relief cuts that allow the waste to be removed more easily. You may also need to consider the best place to start a cut. Generally, it’s easier to enter a cut at a steep angle (closer to 90°) rather than a shallow angle. At a very shallow angle the blade wants to skip along the edge. So when cutting a straight taper, enter from the end of the workpiece, as shown in the right drawing.
WATCH THE FRAME.
Always remember that the saw has a frame that may obstruct completion of a cut. Running into the frame can be a problem when cutting profiles on longer workpieces. Think about which starting point will allow you to avoid the frame. In some instances, you may need to flip the workpiece and mark the layout on the opposite face.
첫 번째 컷.
여러 개의 선이 있는 복잡한 곡선을 절단할 경우 절단 순서를 미리 계획합니다. 가능한 경우 각 개별 단면을 한 번의 절단으로 작업하는 것이 좋습니다. 위의 그림은 이 아이디어를 보여줍니다. 첫 번째 컷은 잘려진 토막을 더 쉽게 제거할 수 있는 단순 절단입니다. 절단을 시작할 가장 좋은 장소를 고려해야 합니다. 일반적으로 얕은 각도보다 가파른 각도(90° 가까이)에서 절단부를 진입하는 것이 더 쉽습니다. 매우 얕은 각도에서는 톱날이 첫 번째 컷 선에 맞춰 건너뛰며 가공합니다. 따라서 직선 테이퍼를 절단할 때는 오른쪽 그림과 같이 가공 부재 끝에서 진입합니다.
밴드쏘의 프레임을 조심하세요.
밴드쏘에는 절단을 방해할 수 있는 프레임이 있다는 것을 항상 기억하십시오. 긴 부재를 절단할 때 프레임에 부딪히면 문제가 될 수 있습니다. 어디서 진입하는 것이 프레임에 걸리지 않고 피할 수 있게 해줄지 생각해보세요. 최악의 경우에 따라 부재를 뒤집고 반대쪽 면에 가공 선을 표시해야 할 수도 있습니다.
MAKING THE CUTS
Now that you’re ready to start a cut, you have to ask, “how close to the layout line do I want to be?” If the saw is set up properly — the right blade and guide setting — you should be able to cut within about 1⁄32 of the line without fear of crossing over (right drawing below). This will leave you with a minimum of cleanup after the cut is completed.
커팅합니다
이제 절단을 시작할 준비가 되었으니 "레이아웃 라인에 얼마나 가까워지고 싶습니까?"라고 물어야 합니다. 톱날과 가이드 설정이 올바르면 교차할 염려 없이 선에서 약 1⁄32 이내에서 절단할 수 있습니다(아래 그림 오른쪽). 이렇게 하면 절단이 완료된 후 최소한의 청소가 가능합니다.
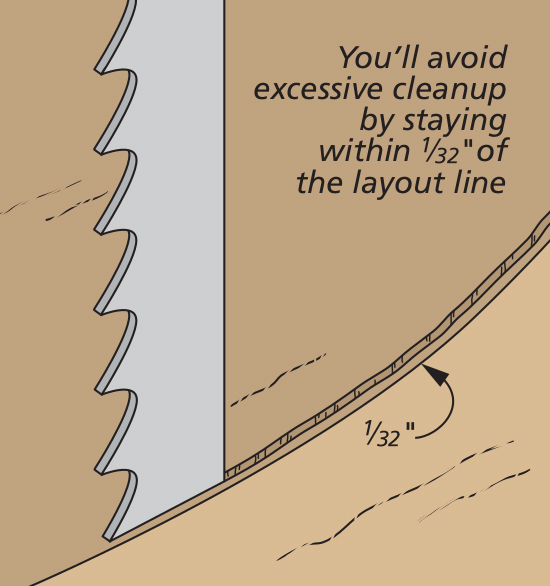
SLOW & STEADY.
A slow, steady feed rate makes it easier to follow a layout line. Avoid forcing the cut. You’ll end up sacrificing control. However, to avoid burning and “hiccups” in the cut, always keep the workpiece moving.
I like to focus my eyes on the layout line just ahead of the point of the cut. This allows you to anticipate changes in direction and you’ll be able to steer more easily and accurately.
TWO HANDS.
I’m right-handed so I usually feed and control the workpiece with my dominant hand while using my left to guide it. You’ll find that a light, sensitive touch with your guide hand produces the best result.
천천히 & 안정적으로.
이송 속도가 느리고 일정하면 레이아웃 선을 더 쉽게 따라갈 수 있습니다. 강제로 힘을 주어 자르지 마세요. 선을 따라가지 못하고 통제력을 잃게 될 거예요 그러나 절단 부분에서 과열로 타거나 및 히크업을(톱날에 의한 절단면의 계단 현상) 방지하기 위해 가공 부재를 멈추지 않고 항상 이동하도록 하십시오. 톱날의 절단 지점 바로 앞에 있는 선에 눈을 집중하세요. 이를 통해 방향의 변화를 예측할 수 있으며 보다 쉽고 정확하게 방향을 잡을 수 있습니다.
두 손으로.
저는 오른손잡이이기 때문에 오른손으로 가공 부재를 이송하고 제어하며 왼손으로 가이드합니다. 가이드하는 왼손으로 가볍고 민감하게 터치하면 가공하면 최상의 결과를 얻을 수 있습니다.
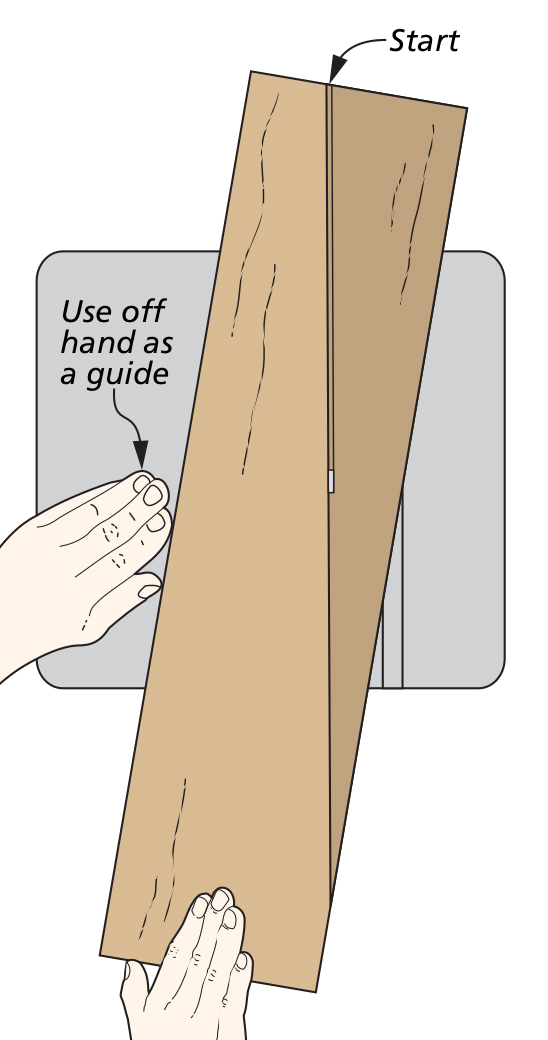
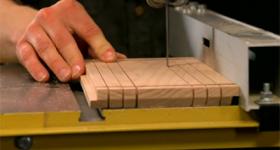
When making a straight cut, you can often use your guide hand as a rub fence. Place the thumb and index finger along the edge of the workpiece and use them to gently steer (drawing above). You’ll find it’s much easier to track a straight line. ONE WAY. Sometimes it’s necessary to back up at the end of a cut, but try to limit this. You’ll usually score or burn the smooth surface. Back up just enough to exit the cut by removing a section of waste (far left drawing).
The only difficult thing here is remembering to slow down and take your time. This will end in a better result from less effort.
직선 절단을 할 때, 가이드하는 왼손을 문지르는 펜스로 사용할 수 있습니다. 엄지손가락과 검지를 가공 부재의 가장자리를 따라 배치하고 이를 사용하여 부드럽게 조향합니다(위 그림). 직진하는 게 훨씬 쉽다는 걸 알게 될 거예요. 한쪽 방향으로만. 때로는 절단이 끝나는 지점에서 후진해야 할 수도 있지만, 이를 자제하도록 하십시오. 보통 매끄러운 표면에 흠집을 내거나 태우게 됩니다. 불필요한 부분을(맨 왼쪽 도면) 제거하여 톱날이 빠져나갈 정도로만 후진합니다.
여기서 유일하게 어려운 것은 속도를 늦추고 천천히 하는 것을 기억하는 것입니다. 이것은 적은 노력으로 더 나은 결과를 가져올 것입니다.

