테이블쏘나 슬라이딩쏘, 그리고 흔히 마루노꼬라 부르는 환거기 등에는 원형톱날을 장착합니다.
기종에 따라 톱날의 지름도 다르고 내경도 다르기 때문에 기본적으로 여러 개의 톱날을 보유하게 되는데요.
그 외 톱날의 두께나 연마를 위한 스페어 톱날까지 포함하면 적지 않은 갯수가 됩니다.
그래서 보통 벽에 걸어 놓거나 구입한 종이 박스에 메모를 해서 넣어 놓기 마련인데 이렇게 보관하면 매우 편리할 듯 합니다.
Better Blade Storage
This plywood case keeps your saw blades organized and safe.
더 나은 톱날 보관함
이 합판 케이스는 톱날을 정리하고 안전하게 보호합니다.
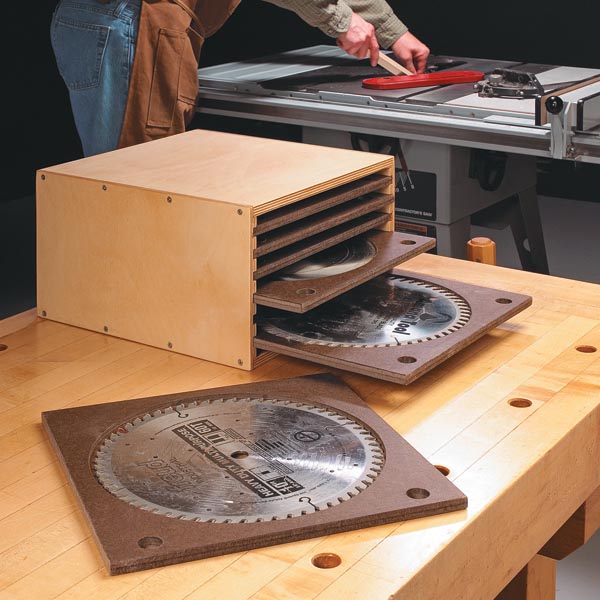
Finding a place to store all of the saw blades for my circular saw, miter saw, and table saw has always been a problem. I needed to find a way to store them in an organized fashion and protect the carbide teeth from chipping.
The blade storage cabinet you see above is what I came up with. The pull-out trays let me store a number of blades in a small space. And the blades nestle in custom cutouts in the trays to protect the the teeth from chipping.
원형 톱, 각도 톱, 테이블 톱 톱날을 모두 보관할 수 있는 장소를 찾는 것은 항상 문제였습니다. 나는 그것들을 조직적인 방법으로 저장하고, 톱날의 이가 나가는 것을 막을 방법을 찾아야 했습니다.
위에 보시는 톱날 수납장은 제가 고안한 것입니다. 쟁반을 뽑아서 좁은 공간에 여러 개의 날을 저장할 수 있게 되어 있습니다. 그리고 그 날들은 이가 잘리는 것을 막기 위해 쟁반에 맞춤형으로 자리잡고 있습니다.
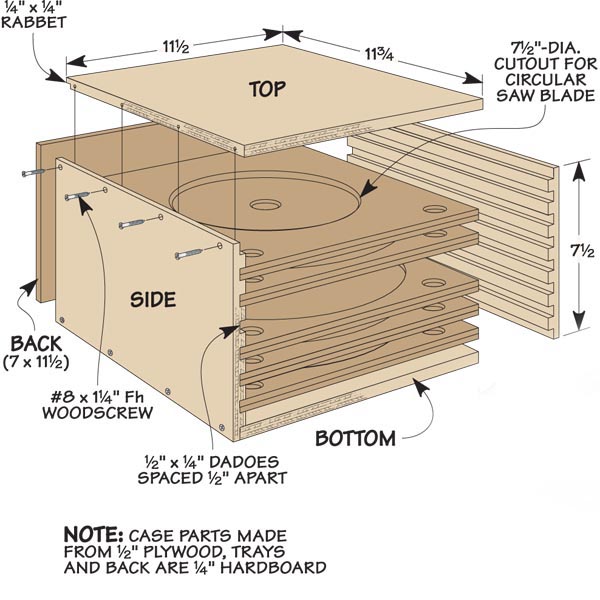
To make the box, I used 1⁄2” Baltic birch plywood. The height of the box is determined by the number of blades you want to store. (My 71⁄2“-high box holds six blades. For the sides of the box, I cut a series of 1⁄2“-wide dadoes spaced 1⁄2” apart. These create the slots to hold the sliding trays. Then I cut rabbets on the ends of the side pieces to accept the top and bottom panels of the box. The last step is to cut a 1⁄4” rabbet on the back edges of all four pieces to accept the back panel. I assembled the box with glue and screws before making the trays.
이 보관함을 만들기 위해, 나는 1½인치 발트 자작나무 합판을 사용했습니다. 상자의 높이는 저장할 톱날 수에 따라 결정됩니다. (71인치 2인치 높이 상자에는 6개의 날이 들어 있습니다. 상자 옆면에는 1½인치 폭의 다도날을 이용해 1½인치 간격으로 홈을 가공했습니다. 슬라이딩 트레이를 고정할 슬롯을 만듭니다. 그런 다음 상자의 상단과 하단 패널을 수용하기 위해 측면 판재의 끝에 홈을 가공합니다. 마지막 단계는 4개 판재의 후면 가장자리에 1µ4" 홈을 가공해 후면 판재를 붙이는 것입니다. 나는 톱날 트레이를 만들기 전에 접착제와 나사로 상자를 조립했습니다.
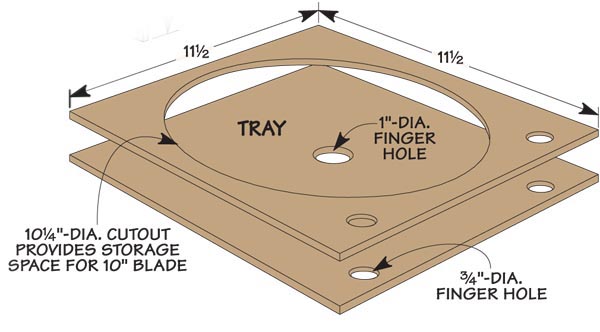
Each tray is made from two layers of 1⁄4” hardboard as you can see in the drawing at left. The top layer is cut out to house the blade. I used a circle-cutting jig on my hand-held router to do this. I sized the circle about 1⁄4” larger in diameter than the blade to make it easy to remove from the tray. After gluing the two layers together, drill a 1″-dia. hole in the bottom layer. This lets you easily push the blade up to remove it from the tray. Two 3⁄4“-dia. finger holes in the front of each tray make it easy to slide the tray out.
각 트레이는 왼쪽의 도면에서 볼 수 있듯이 1½인치 하드보드 두 층으로 만들어 집니다. 윗층은 톱날을 보관하기 위해 원형 가공이 되어 있습니다. 저는 이것을 하기 위해 휴대용 라우터에 원을 만드는 지그를 사용했습니다. 트레이에서 쉽게 꺼낼 수 있도록 원 크기를 톱날보다 1½인치 정도 더 크게 조정했습니다. 두 층을 접착시킨 후 1인치-DIA의 구멍을 뚫습니다. 아래판에 이렇게 구멍을 내면 톱날을 쉽게 위로 밀어 트레이에서 꺼낼 수 있습니다. 각 트레이 앞면에는 3/4인치-DIA의 손가락 구멍 2개로 트레이를 쉽게 잡아당길 수 있습니다.
 [JIG] 연귀 프레임 조립 지그


