Gluing Up Strong Joints
Assembling tough, long-lasting glue joints is simply a matter of “sticking” with a few of the tried-and-true fundamentals.
결구 튼튼하게 접착하기
결구를 단단하고 오래 지속되게 조립하는 것은 검증된 기본 요소를 이용해 "접착"하는 것입니다.
If you removed the glue from the joints, most woodworking projects would be reduced to a jumbled pile of parts. Even the best-planned and well-executed joinery wouldn’t be worth a nickel without the contribution of the glue.
However, when gluing up a joint, it’s pretty easy to take a good end result for granted. The goal is simple — to get the best return on the time spent laying out and cutting a joint. But there’s more to producing a strong glue joint than you might think. And to ensure that the glue does its job, it’s helpful to have a basic understanding of a few simple gluing fundamentals.
결구 부분에서 접착제가 없다면 대부분의 목공 작업은 뒤죽박죽 부품 더미로 전락할 것입니다. 아무리 잘 계획되고 잘 실행된 결구라도 접착제의 기여가 없다면 한 푼도 가치가 없을 것입니다.(우리와는 짜맞춤에 대한 방법 차이가 많기 때문에 번역을 하긴 했지만 전혀 동의할 수 없는 내용이네요)
그러나 결구 부분을 접착제를 사용하면 좋은 결과를 당연하게 생각하기 쉽습니다. 목표는 간단합니다. 조인트를 배치하고 절단하는 데 소요되는 시간을 최대한 활용하는 것입니다. 하지만 튼튼한 접합부를 만드는 데에는 생각보다 많은 방법이 있습니다. 그리고 접착제가 제 역할을 할 수 있도록 하기 위해서는 접착의 기본 사항을 기본적으로 이해하는 것이 도움이 됩니다.
HOW GLUE WORKS. Every woodworker knows from experience that glue makes one piece of wood adhere tightly to another. But not many could tell you how. The truth is, the way glue works isn’t completely understood. But there’s a broad consensus that two different mechanisms are responsible.
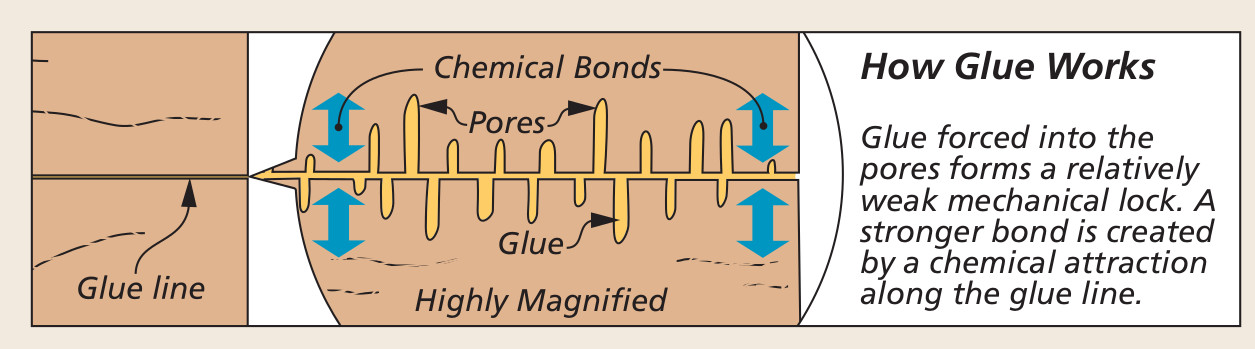
Although most woodworking is done with yellow polyvinyl acetate (PVA) glue, most glues work in essentially the same way. The glue creates both a mechanical and a chemical bond, as illustrated in the drawing above.
A mechanical lock is formed when the glue finds its way into the pores and around the fibers of the wood and then dries hard. Like a nail or screw, it forms a physical bridge between the two pieces of wood, holding them in contact.
But this mechanical connection is actually the weaker force. A stronger bond is formed by a chemical or molecular attraction between the glue and wood. The glue between the two pieces of wood essentially acts like a very powerful magnet to bind them tightly together.
접착제의 작동 원리. 모든 목공인은 접착제가 목재를 단단히 붙게 만든다는 것을 경험을 통해 알고 있습니다. 하지만 그 방법을 알려줄 수 있는 사람은 많지 않습니다. 사실, 접착제가 작동하는 방식은 완전히 이해하기는 쉽지 않습니다. 그러나 두 가지 다른 메커니즘이 원인이라는 광범위한 공감대가 형성되어 있습니다.
대부분의 목공 작업은 노란색 폴리비닐 아세테이트(PVA) 접착제를 사용하는데 여타 접착제도 기본적으로 동일한 방식으로 작동합니다. 위 그림에 표시된 것처럼 접착제는 기계적 결합과 화학적 결합을 모두 생성합니다.
접착제가 목재의 기공과 섬유질 주변으로 들어가서 단단하게 건조되면 기계적 잠금 장치와 같이 형성됩니다. 못이나 나사를 사용하면 목재 사이에 물리적인 다리를 형성하여 서로 접촉을 유지합니다.
그러나 못이나 나사 연결은 실제로 더 약합니다. 더 강한 결합은 접착제와 목재 사이의 화학적 또는 분자적 인력에 의해 형성됩니다. 접착제는 본질적으로 매우 강력한 자석처럼 작용하여 목재를 단단히 결합시킵니다.
THIN GLUE LINE. For this chemical attraction to be most effective, the two pieces of wood need to be in very close contact and the glue line should be very thin. You won’t achieve a strong bond across a wide gap in a joint even if there’s glue filling it. The excess glue will simply act as a weak link to diminish the long-term strength.
얇은 접착제 선. 이 화학적 인력이 가장 효과적이려면 두 나무 조각이 매우 가까이 접촉해야 하며 접착제 선은 매우 얇아야 합니다. 접착제로 채워져 있더라도 장부의 틈이 넓다면 강력한 결합을 얻을 수 없습니다. 과도한 접착제는 단순히 장기적인 강도를 약화시키는 약한 고리 역할을 할 뿐입니다.
THE THREE ESSENTIALS. So the next s question is, what do I need to do to make sure the glue gives me the strongest possible bond? Basically, there are three aspects to successfully gluing up a joint. And they’re pretty easy to grasp.
세 가지 필수 요소. 그럼 다음 질문은 접착제가 가능한 가장 강한 결합을 제공하도록 하려면 무엇을 해야 할까요? 기본적으로 장부를 성공적으로 접착하는 데는 세 가지 측면이 있습니다. 그리고 그것들은 이해하기 매우 쉽습니다.
A GOOD FIT. First, the joint needs to fit properly. The mating surfaces should be smooth, flat and make good contact. As I described, an extra dose of glue won’t make up for sloppy joinery. And on the other hand, a joint that fits too tight may not have space to establish a good glue line. “Hand pressure snug” is a good rule of thumb.
잘 맞음. 첫째, 장부가 제대로 맞아야 합니다. 맞닿는 표면은 매끄럽고 평평해야 하며 접촉이 잘 되어야 합니다. 제가 설명했듯이 접착제를 더 많이 바르더라도 엉성한 장부는 메울 수 없습니다. 반면에 너무 꽉 맞는 장부는 좋은 접착 라인을 형성할 공간이 없을 수 있습니다. "손으로 눌러서 꼭 맞는" 것이 좋은 경험 규칙입니다.
WHERE AND HOW MUCH? Second, you need to add the right amount of glue to the joint and put it where it will do the most good. Use too little glue and you’ll risk a “starved” joint — too much, and the joint may not close up tightly. The goal is to end up with a continuous layer of glue between the mating pieces. So the glue should be spread in a way that ensures even coverage across the joint.
CLAMP IT RIGHT.
The final factor is proper clamping pressure. Clamping a joint serves more than one purpose. Obviously, the clamps close the joint and hold the surfaces in contact until the glue dries.
But just as important, the pressure applied by the clamps creates a thin glue line and also helps the glue penetrate and “wet” the wood. So you need to think about both the number of clamps you use and where you place them. As a general rule, when gluing a joint, the more clamps, the better.
어디에, 얼마나 사용하나요? 둘째, 장부에 적절한 양의 접착제를 넣고 가장 효과가 좋은 곳에 붙여야 합니다. 접착제를 너무 적게 사용하면 "속이 빈" 장부가 생길 위험이 있고, 장부가 꽉 붙지 않을 수 있습니다. 목표는 맞물리는 장부 사이에 접착제를 연속적으로 만드는 것입니다. 따라서 접착제는 장부 전체에 고르게 도포되도록 펴 발라야 합니다.
꼭 고정하세요.
마지막 요소는 적절한 클램핑 압력입니다. 장부를 클램핑하는 것은 여러 가지 목적을 위해 사용됩니다. 분명히 클램프는 장부를 밀착시키고 접착제가 마를 때까지 표면을 접촉 상태로 유지합니다.
하지만 중요한 점은 클램프가 가하는 압력이 얇은 접착제 선을 만들고 접착제가 나무에 침투하여 "적시는" 데 도움이 된다는 것입니다. 따라서 사용하는 클램프의 수와 클램프를 물리는 위치도 모두 고려해야 합니다. 일반적으로 장부를 접착할 때는 클램프가 많을수록 좋습니다.
SOME PRACTICAL EXAMPLES. So how does all this relate to gluing up a particular joint? Well, each type of woodworking joint is a little different. But a look at just a few common examples will give you a good general understanding of how to tackle a particular joint.
몇 가지 실용적인 예. 그럼 이 모든 것이 특정 장부를 접착하는 것과 어떻게 관련이 있을까요? 각 작업의 결구 유형은 약간씩 다릅니다. 하지만 몇 가지 일반적인 예만 살펴보면 특정 장부를 처리하는 방법에 대한 전반적인 이해를 할 수 있습니다.
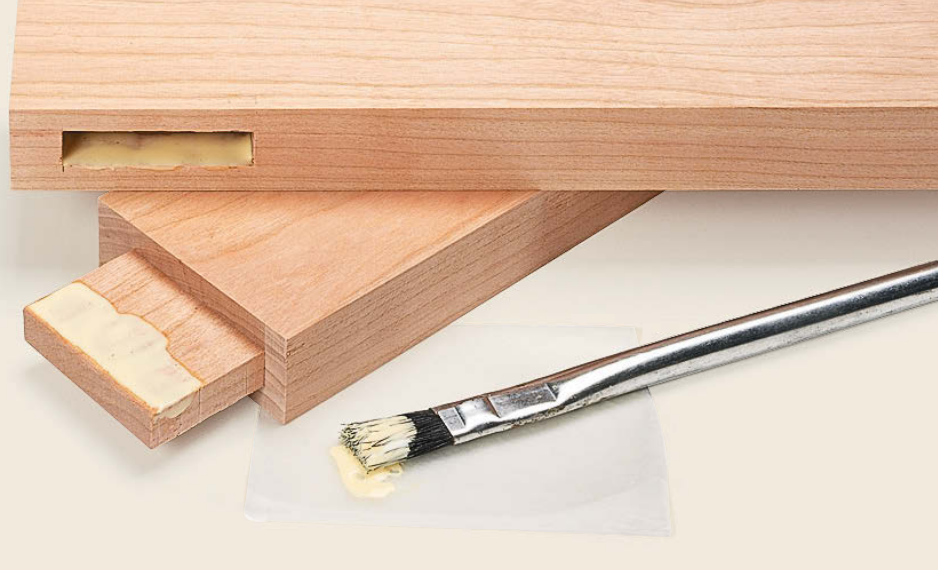
MORTISE AND TENON. When assembling a mortise and tenon, the fit of the joint and how you apply the glue are foremost. A clamp will close the joint for the best appearance, but doesn’t really apply force across the gluing surfaces.
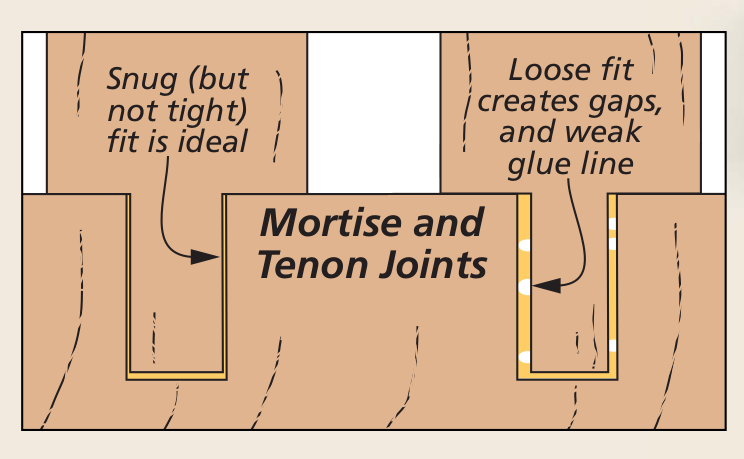
The drawing and photo above illustrate this point. To end up with a thin, strong glue line, the tenon has to fit snugly, but not too tightly, in the mortise. The glue won’t form a strong bond across gaps between the mortise and tenon.
And you’ll notice in the photo that glue is spread on both the end of the tenon and at the top of the mortise. As the tenon is inserted into the mortise, the glue in the mortise is forced down while the glue on the tenon is forced back, resulting in full, even coverage.
숫장부와 암장부 결합. 숫장부와 암장부를 조립할 때 가장 중요한 것은 장부의 적합성과 접착제를 바르는 방법입니다. 클램프는 최상의 외관을 위해 장부를 밀착시키지만 접착 표면에 실제로 힘을 가하지는 않습니다.
아래 그림과 사진은 이 점을 잘 보여줍니다. 얇고 강한 접착선을 얻으려면 숫장부가 암장부에 꼭 맞아야 하지만 너무 꽉 끼어서는 안 됩니다. 그러면 접착제는 숫장부와 암장부 사이의 틈새에 강한 결합을 형성하지 못합니다.
그리고 아래 사진에서 숫장부 끝과 암장부의 꼭대기에 접착제가 발라져 있는 것을 알 수 있습니다. 숫장부를 암장부에 삽입하면 암장부의 접착제가 아래로 밀려 내려가고 숫장부의 접착제는 뒤로 밀려서 완전하고 고르게 덮입니다.
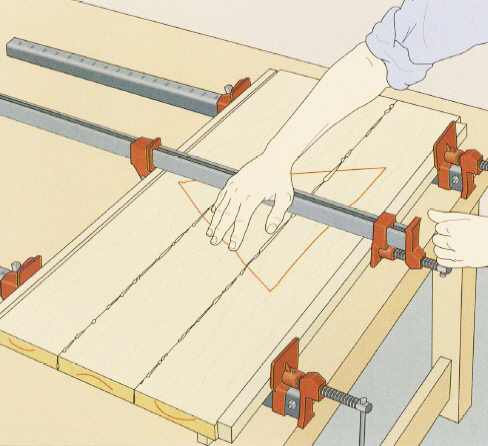
AN EDGE JOINT. The strength of an edge joint is entirely reliant on the action of the glue. So the fit of the joint, how you apply the glue, and clamping pressure all play a pretty important role.
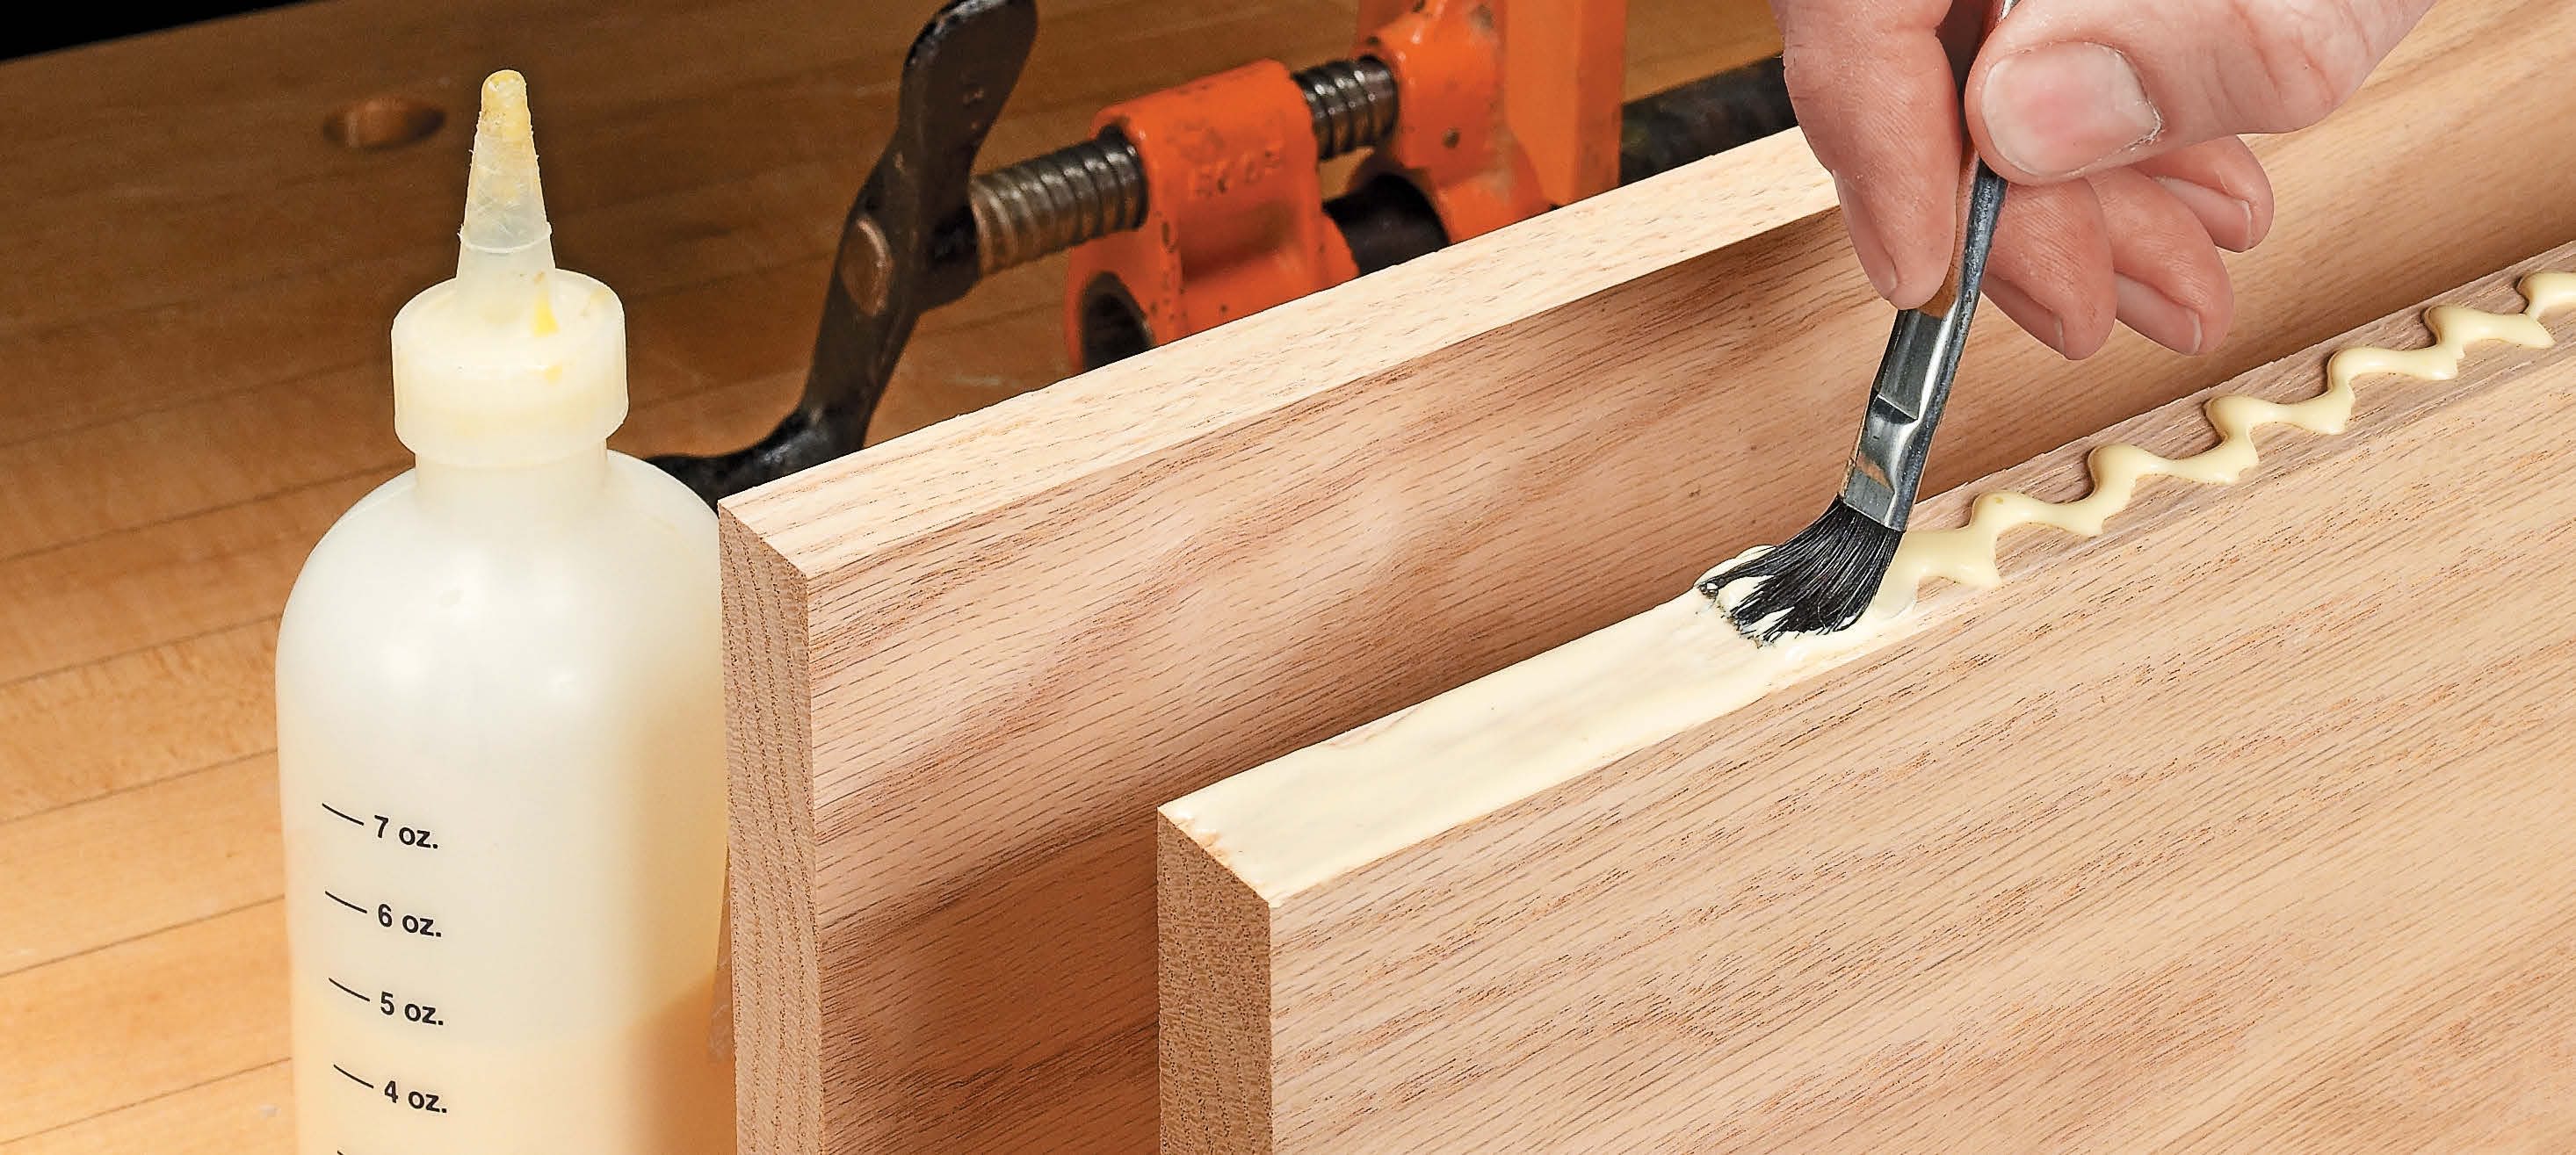
The edges to be glued should be smooth and straight so that you have good wood-to-wood contact all along the joint. A generous bead of glue should be applied to one edge and then spread evenly over the surface (main photo on the opposite page).
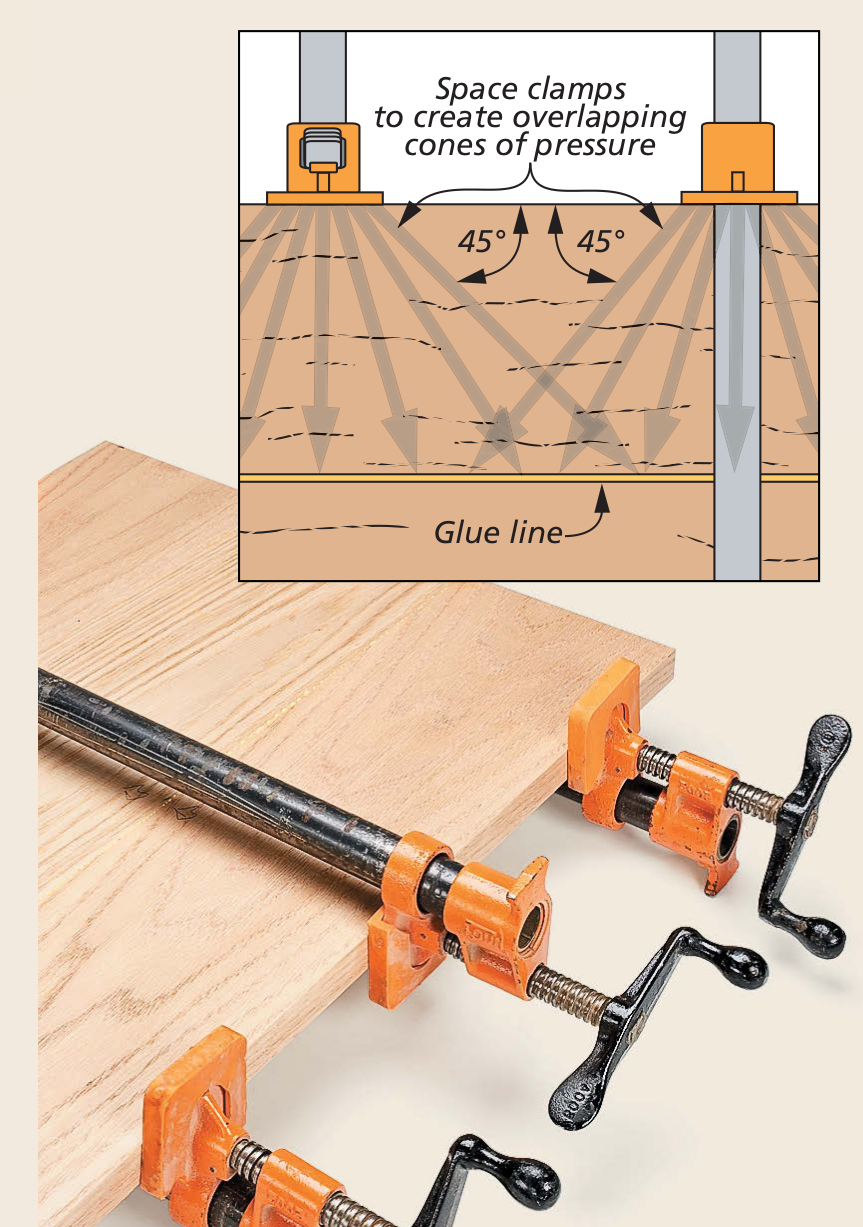
Finally, use closely spaced clamps to ensure overlapping “cones” of pressure along the joint, as in the lower left drawing and photo. This last step is a big key to creating the thin, “invisible” glue line that yields a strong joint.
집성 작업. 집성의 강도는 전적으로 접착제의 작용에 달려 있습니다. 따라서 집성면의 적합성, 접착제를 바르는 방법, 클램핑 압력은 모두 매우 중요한 역할을 합니다.
접착할 면은 매끄럽고 곧아야 하며, 이음새 전체에 걸쳐 목재와 목재가 잘 접촉해야 합니다. 한 면에 접착제를 넉넉히 바르고, 그 다음 고르게 펴 바릅니다(반대 페이지의 주요 사진).
마지막으로 아래 그림과 같이 이음새의 "삼각표시"가 잘 맞도록 클램프를 사용합니다. 이 마지막 단계는 강력한 밀착을 생성하는 얇고 "보이지 않는" 접착제 라인을 만드는 데 큰 열쇠가 됩니다.
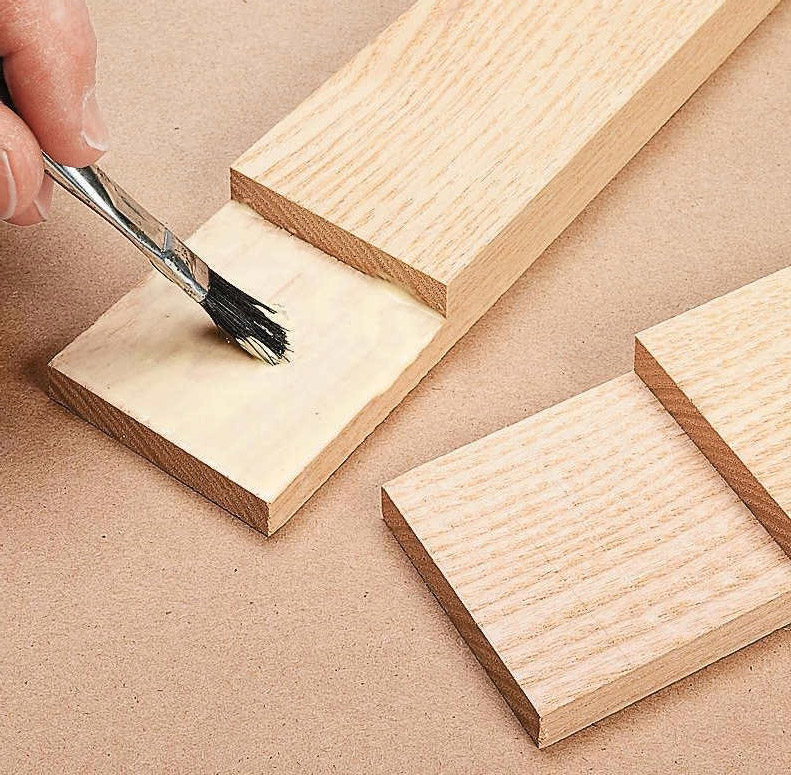
A LAP JOINT. Thanks to an abundance of gluing surface, a simple lap joint can be very strong. But here again, gluing the joint has slightly different considerations.
In order to make the most of a lap joint’s gluing strength, you need to start with smooth, flat surfaces. Ridges, grooves, and unevenness will prevent good contact and greatly weaken the joint.
To assemble the joint, you’ll simply lay one half over the other. So unlike a mortise and tenon, you can’t rely on a “sliding” action to produce a continuous layer of glue. Instead, this is done by spreading glue liberally over one face of the joint, as in the photo below.
As with a mortise and tenon, applying clamps along the length of the pieces will pull the shoulders tight, but this won’t provide pressure across the gluing surfaces. To do this, a clamp should be tightened across the two halves of the joint, as shown in the drawing below.
What all this comes down to is keeping the basic goals in mind and then tailoring each particular glueup to achieve them. If you do this, you really will be able to take strong glue joints for granted.
맞댐 결구. 접착 표면이 풍부하기 때문에 간단한 맞댐 결구도 매우 튼튼할 수 있습니다. 하지만 여기서도 결구 접착에는 약간 다른 고려 사항이 있습니다.
맞댐 결구의 접착력을 최대한 활용하려면 매끄럽고 평평한 표면부터 시작해야 합니다. 능선, 홈, 고르지 않은 부분은 강한 밀착을 방해하고 결구를 크게 약화시킵니다.
맞댐 결구를 조립하려면 반쪽을 다른 쪽 위에 놓으면 됩니다. 따라서 암장부, 숫장부와 달리 "슬라이딩" 동작에 의존하여 접착제 면을 만들 수 없습니다. 대신 아래 사진과 같이 결구의 한 면에 접착제를 아낌없이 펴서 이를 수행합니다.
숫장부 암장부 결구와 마찬가지로 장부의 길이를 따라 클램프를 적용하면 어깨가 팽팽해지지만 접착 표면에 압력을 가하지는 않습니다. 이렇게 하려면 아래 그림과 같이 장부의 두 반쪽에 클램프를 조여야 합니다.
이 모든 것이 결국은 기본 목표를 염두에 두고 각각의 특정 접착을 조정하여 이를 달성하는 것입니다. 이렇게 하면 강력한 접착 장부를 당연하게 만들 수 있을 것입니다.
 셀프 메꿈 노하우(땜빵)


