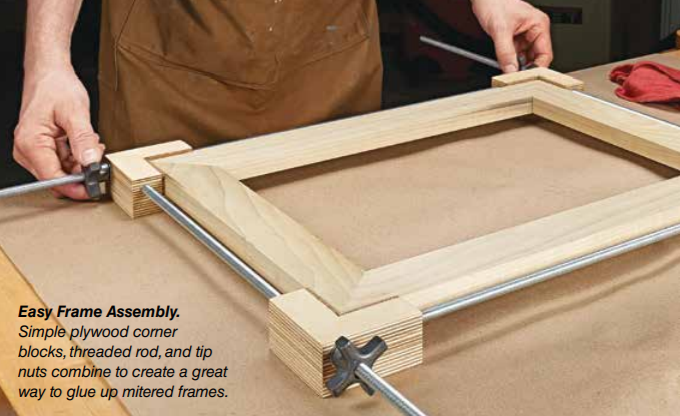
촉이 없는 프레임의 맞짜임 연귀 조립을 하기 위해 많이 사용하는게 밴드 클램프가 아닐까 싶습니다.
하지만 그 효과는 그리 좋지 못하죠. 밴드가 늘어나기도 하고 조이는데도 힘이 많이 부족해 연귀 부분이 쉽게 틀어져버리기 때문입니다.
이번주 우드스미스 팁은 효과적인 연귀조립을 위한 자작 프레임 클램프 입니다.
소형 문짝이나 소형 액자 조립에는 매우 편리할 것 같습니다.
하지만 길이가 좀 긴 프레임이면 조이는 과정에서 전산볼트가 쉽게 휘어 각도를 유지하는게 어려울 것으로 예상되는데 나사산이 있는 파이프 같은 것으로 보강해준다면 긴 프레임 조립에도 좋을 것 같습니다. 거기에 L자형 블록 안쪽에 구멍을 뚫어 연귀 모서리가 손상되지 않도록 해준다면 금상첨화 일 것 같네요.
Woodworking Tip: Shop-made Frame Clamp
Mitered frames have a clean look and a timeless appeal. But as a woodworker, they can sometimes be a pain in the neck. The biggest hassle? Gluing the corners together. The miter joint faces slide out of position if you try to use ordinary clamps. The answer to my frustrations came in the form of the frame clamp you see here.
프레임 클램프 목공 팁
프레임의 연귀 조립은 깔끔한 외관과 시대를 초월한 매력을 지니고 있습니다. 하지만 목공으로서, 그것들은 때때로 골칫거리가 될 수 있습니다. 가장 큰 번거로움은 모서리를 접착제로 붙이고 일반 클램프를 사용하려고 하면 연귀 조립 부분이 자꾸 틀어집니다. 제 좌절에 대한 답은 여기 보시는 프레임 클램프의 형태로 나왔습니다.
The plywood corner blocks capture and draw all the joints together at once. The blocks are joined with lengths of threaded rod you can get at the hardware store. I used tip nuts to speed up the process of adjusting the knobs and blocks.
합판으로 만든 모서리 블록은 모든 조인트를 한 번에 캡처하고 그립니다. 블록은 하드웨어 스토어에서 구할 수 있는 전산볼트와 결합되어 있습니다. 나는 노브와 블록의 조정 속도를 높이기 위해 팁 너트를 사용했습니다.

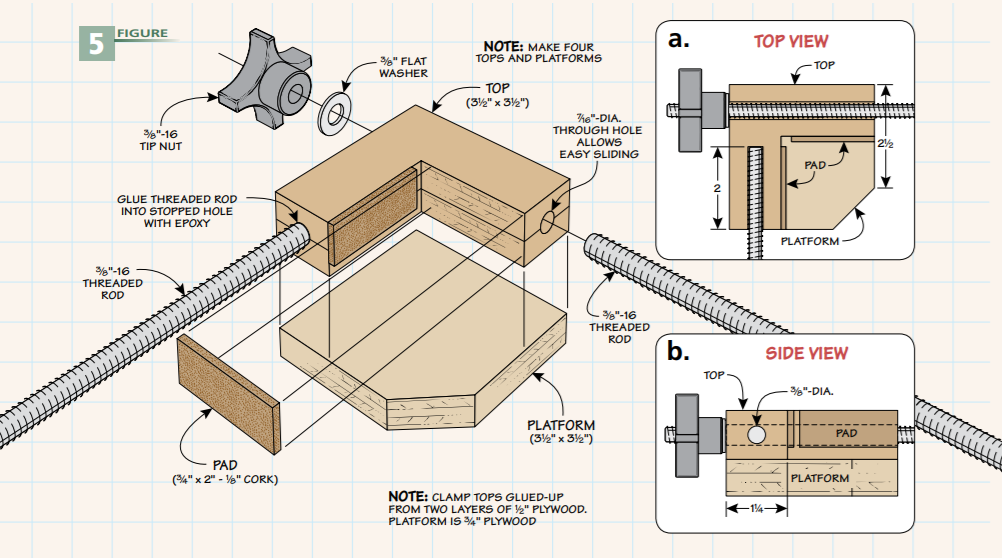
Making the Blocks. Each block consists of three layers of plywood. The lower layer serves as a platform for holding the corner of the mitered frame. I clipped the inside corner of the platform to ease the edge. The top is glued up from two layers of plywood and cut into an L-shape. It accepts a pair of threaded rods. The key is making sure the inside corner is 90°. The holes in the top aren’t identical. One is stopped, and the other is a through hole. When drilling these holes, be consistent. The blind hole in one block should align with the through hole in the adjoining block.
블록 만들기. 각 블록은 세 층의 합판으로 구성되어 있습니다. 아래판은 프레임의 모서리를 고정하는 플랫폼 역할을 합니다. 나는 가장자리를 완화하기 위해 플랫폼의 안쪽 모서리를 잘랐습니다. 윗부분은 두 겹의 합판으로 붙이고 L자 모양으로 자릅니다. 전산볼트를 한 쌍 수용합니다. 핵심은 내부 모서리가 90°인지 확인하는 것입니다. 윗부분의 구멍은 똑같지 않아요. 하나는 관통하지 않고, 다른 하나는 관통된 구멍입니다. 구멍을 뚫을 때 일관성을 유지하십시오. 한 블록의 관통하지 않은 구멍은 인접한 블록의 관통된 구멍과 정렬되어야 합니다.

After gluing the layers together, you can apply cork pads to the inside face. This keeps the clamp from marring the frame and provides a relief in the corner. Finally, be sure to wax the platform before use so the frame isn’t glued to the clamp blocks.
겹겹이 접착한 후 코르크 패드를 안쪽면에 붙입니다. 이렇게 하면 클램프가 프레임에 손상되지 않고 구석에 완화됩니다. 마지막으로, 프레임이 클램프 블록에 접착되지 않도록 플랫폼에 왁스를 칠해야 합니다.


