Make cleaner jigsaw cuts
Choose the right tooth count for the cuts you make.
더 깨끗한 절단면을 위한 직소기
절단면에 맞는 적절한 톱날을 선택하세요.
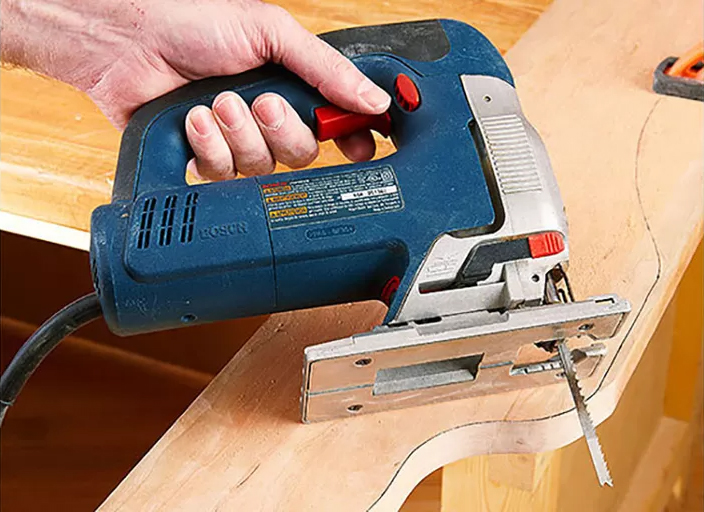
The road from Splinterville starts at the blade
Choose the right tooth count for the cuts you make. Blades with aggressive 6-tooth-per-inch (tpi) designs work great for sawing construction lumber, but cut too coarsely for woodworking project parts. Instead, select a 10- to 12-tpi blade for larger, gradual curves, or a 20-tpi blade for tight curves (1" radius or less) in solid wood and all cuts in plywood or melamine-coated particleboard.
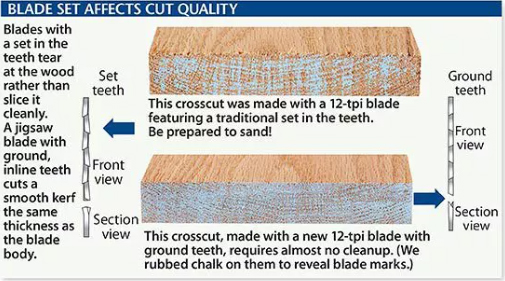
Beyond tooth count, also consider the blade design. For decades, jigsaw-blade teeth were "set," alternately leaning left and right, as shown in chart. This makes them cut coolly and quickly, but at the expense of cut quality.
To remedy this, several manufacturers now make blades with ground, inline teeth, as shown chart, that slice the wood like a surgical scalpel rather than bluntly tear at it. This produces much cleaner cuts. For this reason, in the WOOD® magazine shop we use Bosch Clean-For-Wood and Bosch Xtra-Clean-For-Wood blades. Just be aware that these blades can burn your wood if you set the jigsaw's speed too fast or feed the saw through the wood too slowly. Our best advice: Practice on scrap of the same species to find the best combination of speed and feed rate.
Finally, remember that jigsaw blades cost a fraction of the material you're cutting. So know when to call it quits on a blade. If a blade begins to burn the wood or tear out surface fibers where it didn't used to, or if it requires greater effort to push through a cut, chuck it and get a new one.
Splinterville의 길은 칼날에서 시작됩니다.
절단 작업에 적합한 톱날을 선택하세요. 인치당 6개의 톱니(tpi)이 있는 공격적인 디자인의 톱날은 건설용 목재를 절단하는 데 적합하지만 목공 작업에는 너무 거칠게 절단됩니다. 큰 곡선에는 10~12tpi 톱날을 선택하고 단단한 목재의 좁은 곡선(반경 1인치 이하)과 합판이나 멜라민 코팅 파티클보드의 모든 절단에는 20tpi 톱날을 선택하세요.
톱니 수 외에도 톱날 디자인도 고려하세요. 수십 년 동안 직소기의 톱날은 차트에 표시된 대로 번갈아가며 좌우로 기울어(날어김) "설정"되었습니다. 이로 인해 시원하고 빠르게 절단할 수 있지만 절단면의 품질은 떨어집니다.
이를 해결하기 위해 여러 제조업체에서 도표에 표시된 대로, 나무를 찢는 대신 수술용 메스처럼 잘라내는 갈린 인라인 톱니가 있는 톱날을 만들고 있습니다. 이렇게 하면 훨씬 더 깨끗한 절단이 가능합니다. 이러한 이유로 WOOD ® 잡지 매장에서는 Bosch Clean-For-Wood 및 Bosch Xtra-Clean-For-Wood 톱날을 사용합니다 . 직소기의 속도를 너무 빠르게 설정하거나 톱날의 궤도 동작을 너무 느리게 하면 톱날이 나무를 태울 수 있다는 점에 유의하세요. 가장 좋은 조언은 동일한 종류의 나무에 연습하여 톱날 속도와 궤도 동작의 최상의 조합을 찾는 것입니다.
마지막으로, 직소기 톱날은 절단하는 재료의 일부에 불과하다는 것을 기억하세요. 따라서 톱날을 언제 교체 해야할 지 알아야 합니다. 톱날이 나무를 태우거나 원래 없던 거스러미가 심하게 생기거나 절단을 하기 위해 평소보다 더 많은 힘이 필요하다면, 톱날을 교체하세요.
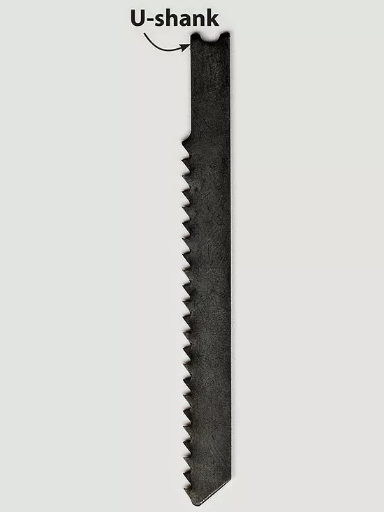
U-shank blades
U-shank blades tend to wobble, flex more, and produce more tear-out than T-shank blades. If you own a jigsaw that uses these blades, unfortunately, you have fewer options in blade choices. Opt for higher tooth counts as much as possible to reduce tear-out.
U형 섕크 톱날
U형 섕크 톱날은 T형 섕크 톱날보다 흔들리고, 더 많이 구부러지고, 더 많은 찢어지는 현상을 유발하는 경향이 있습니다. 이러한 톱날을 사용하는 직소기를 소유하고 있다면 불행히도 톱날 선택의 폭이 좁습니다. 찢어지는 현상을 줄이려면 가능한 한 톱니 수가 많은 것을 선택하세요.
Progressive-tooth blades
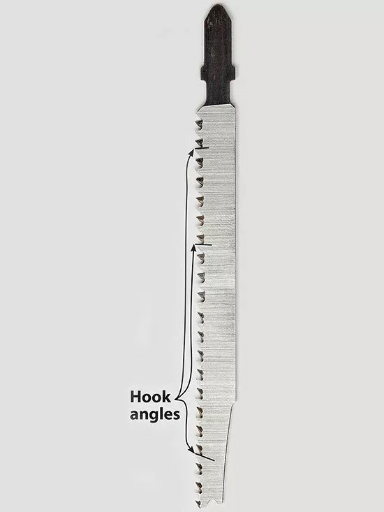
Progressive-tooth blades have a greater hook angle near the tip, putting those aggressive teeth where they're needed for fast cutting in materials thicker than 1". Less-aggressive teeth close to the shank end help the blade cleanly exit the top surface of the workpiece.
진행형 톱니 톱날
진행형 톱니 톱날은 팁 근처에 더 큰 후크 각도를 가지고 있어 1인치보다 두꺼운 소재를 빠르게 절단하는 데 필요한 곳에 공격적인 톱니를 배치합니다. 섕크 끝 부분에 가까운 덜 공격적인 톱니는 톱날이 작업물의 상단 표면에서 깨끗하게 빠져나가는 데 도움이 됩니다.
Standard 6-tpi blades
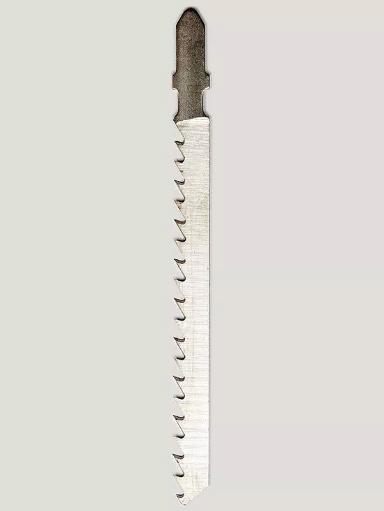
Standard 6-tpi blades use steep hook angles on the teeth and large gullets between them for quick waste removal. These blades work best when speed is more important than cut quality, such as working with construction lumber.
표준 6-tpi 톱날
표준 6-tpi 톱날은 톱니에 가파른 후크 각도와 그 사이에 큰 홈을 사용하여 톱밥을 빠르게 제거합니다. 이러한 톱날은 건축용 목재 작업과 같이 절단 품질보다 속도가 더 중요할 때 가장 적합합니다.
Reverse-tooth blades
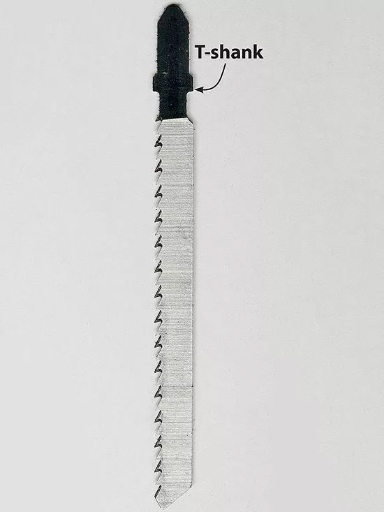
Reverse-tooth blades cut on the downstroke, minimizing chip-out on the face side of a workpiece when you must put the best face up during cuts. Making a sink cutout in a countertop calls for one of these blades.
역톱니 톱날
역톱니 톱날은 하향 스트로크에서 절단하여 절단 중에 최상의 표면을 위로 올려야 할 때 작업물의 표면 쪽에서 톱밥 배출을 최소화합니다. 싱크대 상판을 자르려면 이러한 톱날 중 하나가 필요합니다.
Now set up the jigsaw
For softwoods, softer hardwoods (poplar, mahogany, alder, etc.), and sheet goods, run your jigsaw at its highest speed for most cuts. If you encounter resistance, back off the speed slightly. Dense hardwoods, such as cherry, maple, oak, and walnut, call for a slower blade speed to avoid burning. Use the slowest speed setting for cutting plastics and metals.
If your jigsaw has an orbital setting—an internal action that rocks the blade in a pendulum-like motion while simultaneously stroking up and down—set it to the greatest orbit for fast, but rough, cutting. Turn off the orbital action for cutting curves with less than a 3" radius. But if you're cutting large, sweeping curves, a little orbital action helps.
You also can reduce top-face workpiece tear-out by adding a zero-clearance shoe, such as the one shown at right, to your jigsaw. Make it from 1⁄4 " hardboard and secure it to the saw's foot with machine screws or double-faced tape. Ease the corners and edges with sandpaper to prevent making any scratches on your workpieces.
이제 직소기를 설정하세요
연목, 연약한 경목(포플러, 마호가니, 오리나무 등) 및 시트지를 붙인 제품의 경우 대부분 절단 시 직소기를 최고 속도로 작동시킵니다. 저항이 발생하면 속도를 약간 낮추십시오. 체리, 메이플, 오크, 호두와 같은 조밀한 경목은 타는 것을 방지하기 위해 톱날 속도를 느리게 해야 합니다. 플라스틱과 금속을 절단할 때는 가장 느린 속도 설정을 사용하십시오.
직소기에 궤도 설정이 있는 경우(진자처럼 움직이면서 동시에 위아래로 움직이는 내부 동작) 빠르지만 거친 절단을 위해 가장 큰 궤도로 설정합니다. 반경이 3인치 미만인 곡선을 절단하는 경우 궤도 동작을 끕니다. 하지만 크고 휘어진 곡선을 절단하는 경우 약간의 궤도 동작이 도움이 됩니다.
아래 사진과 같은 제로 클리어런스 슈를 직소기에 추가하여 상단 표면에 거친 거스러미가 생기는 것을 줄일 수도 있습니다. 1 ⁄ 4 인치 하드보드로 만들고 기계 나사 또는 양면 테이프로 톱의 발에 고정합니다. 작업물에 긁힘이 생기지 않도록 사포로 모서리와 가장자리를 부드럽게 합니다.
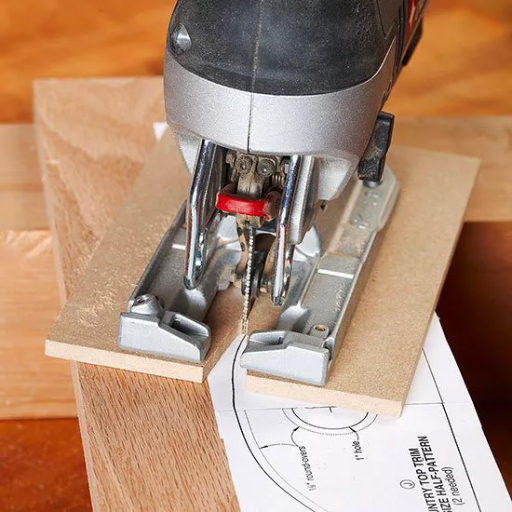
Cut a V-notch in the shoe to just infront of the blade. This opens yoursight lines while maintaininganti-chip-out protection.
V자 홈을 톱날 바로 앞에 만듭니다. 이렇게 하면 시야가 넓어지고 칩 아웃 방지 보호 기능도 유지됩니다.
 마그네틱 집진 시스템
 [유지관리] 원형톱날 보관 팁


